
# Bees360 SSO
Single Sign-On (SSO) enables customers to allow their users to log in to Bees360 using their corporate Identity Provider (such as Google Workspace, Okta, OneLogin, etc) credentials.
# What are the benefits of SSO?
SSO provides security and compliance benefits such as
- Using SSO, Bees360 Customers can have a single source for authenticating their users (through the IdP). They can also manage security and compliance policies such as password policies and mandating two-factor authentication in a single place.
- Similarly when users leave their organization, they just have to disable/remove the user from one place.
# How does Bees360 SSO work?
SSO for Bees360 supports SAML (Security Assertion Markup Language) 2.0 standard. Once SSO is configured, Bees360 acts as a Service Provider (SP) and allows users to log in either via IdP-initiated flows or SP-initiated flows.
- When SSO is enforced, a user will only be able to log in by SSO. They can’t log in using their password.
- Bees360 SSO only handles the authentication - what accounts a user has access to and what roles the user has aren’t managed by SSO.
# Configuring SSO for Bees360
# Prerequisites
Before starting the configuration for Bees360 SSO, please check and make sure that you have
- An Identity Provider which supports SAML 2.0
- Apply for a company account from Bees360
- A Company Domain to which the user's email addresses belong to
For configuring the SSO you have to follow these steps
- You will need to add Bees360 (as SP) metadata into your IdP and then configure your IdP metadata into Bees360.
- Once both sides have the metadata configured, you can test the SSO connection to make sure that everything is in order.
# Configuration Guides
Please follow the configuration guides specific to your Identity Provider system from the links below. If your Identity Provider system is not listed below, please use the ‘Other SAML 2.0’ guide.
# Configuring Google Workspace with Bees360 SSO
# Step 1: Create a new SSO Profile in Bees360 Company Setting
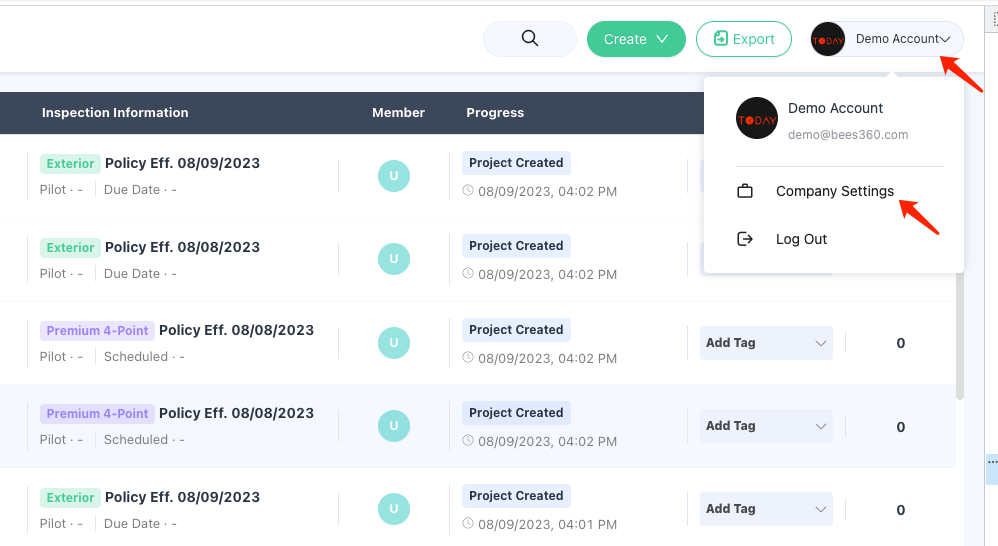
Click Avatar , go to Company Setting, and click on the Authentication option in the navigation bar as shown below
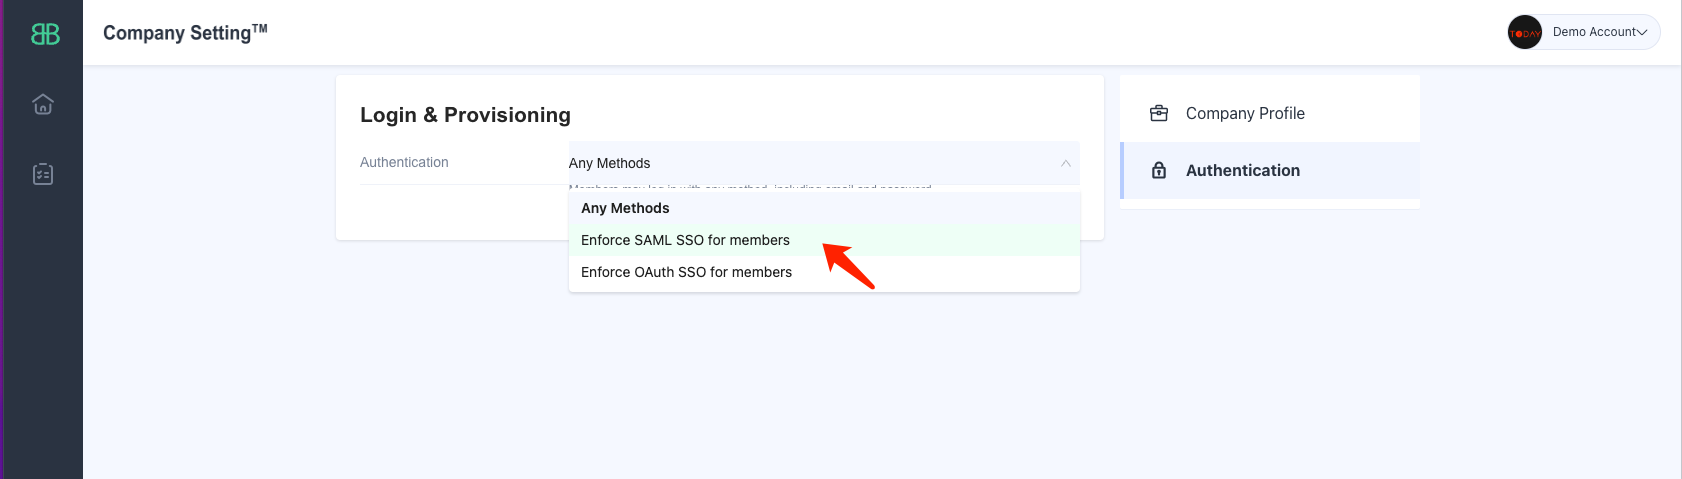
Create a new SSO Profile by selecting the ‘SAML SSO’ option. You will land on the below screen where you can copy the SP Metadata.
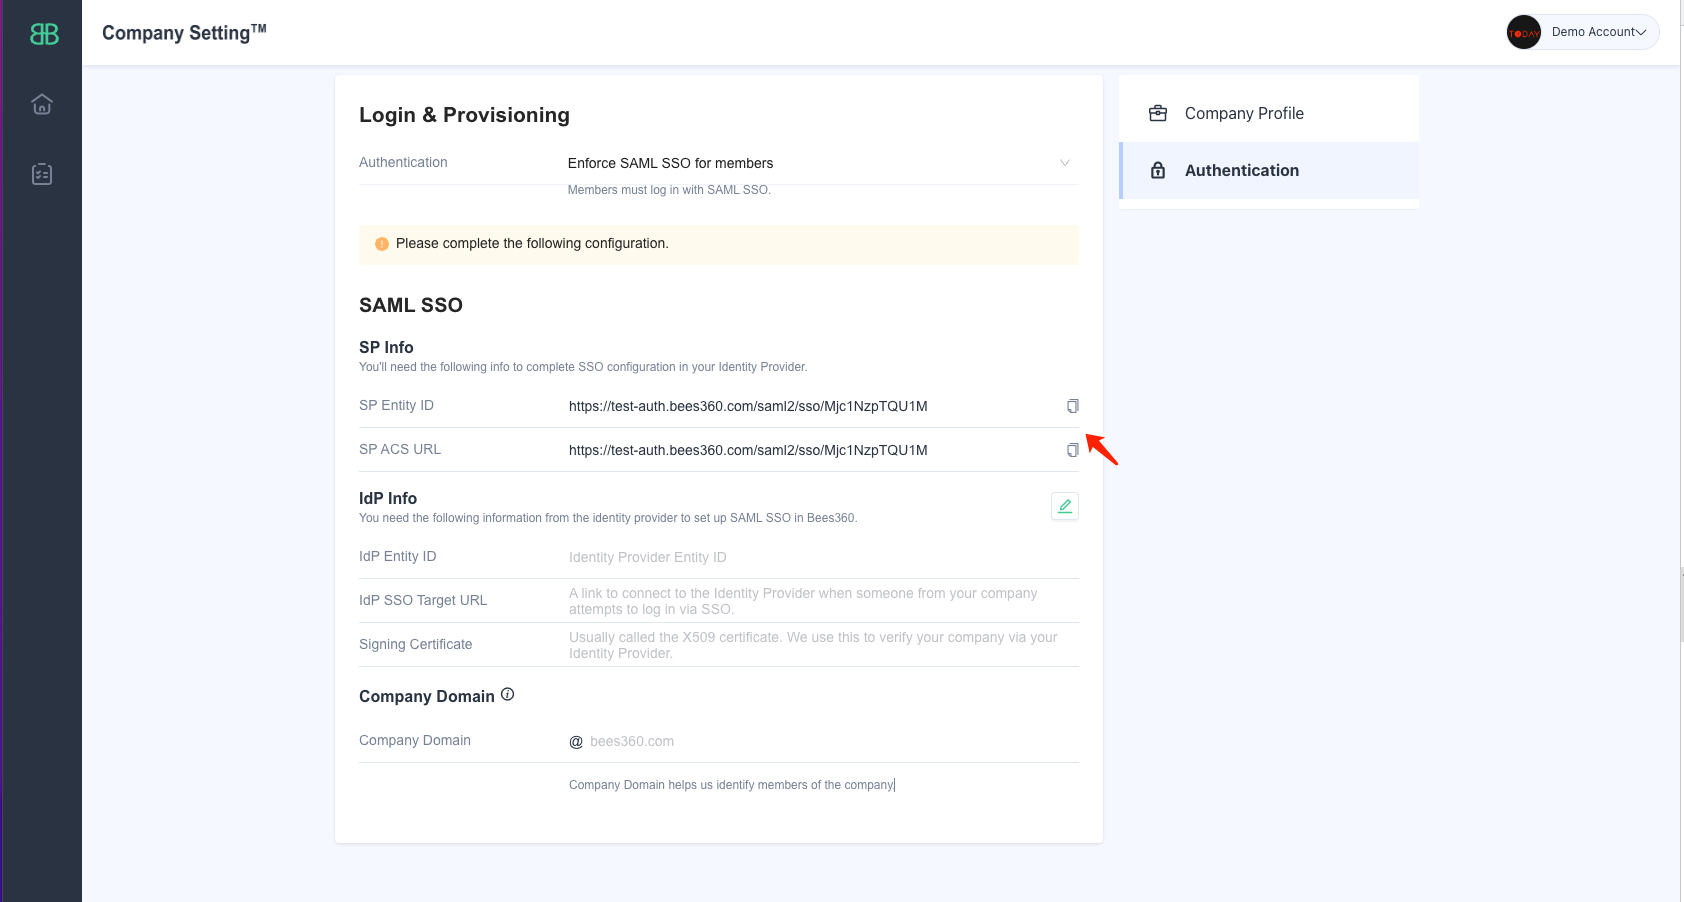
Keep this tab open as you will need to copy and paste the Entity ID and Single Sign On URL values in Google Workspace
# Step 2: Create a new SAML Application Integration in Google
To set up SSO login with Google Workspace for Bees360, their IT staff need to go to their Google Workspace admin panel and add Bees360 as a custom SAML application. Here are the detailed instructions provided by Google: https://support.google.com/a/answer/6087519?hl=en
# 1. In a new tab open your Google Admin console,
# 2. In the Admin console, go to Menu 

 AppsWeb and mobile apps
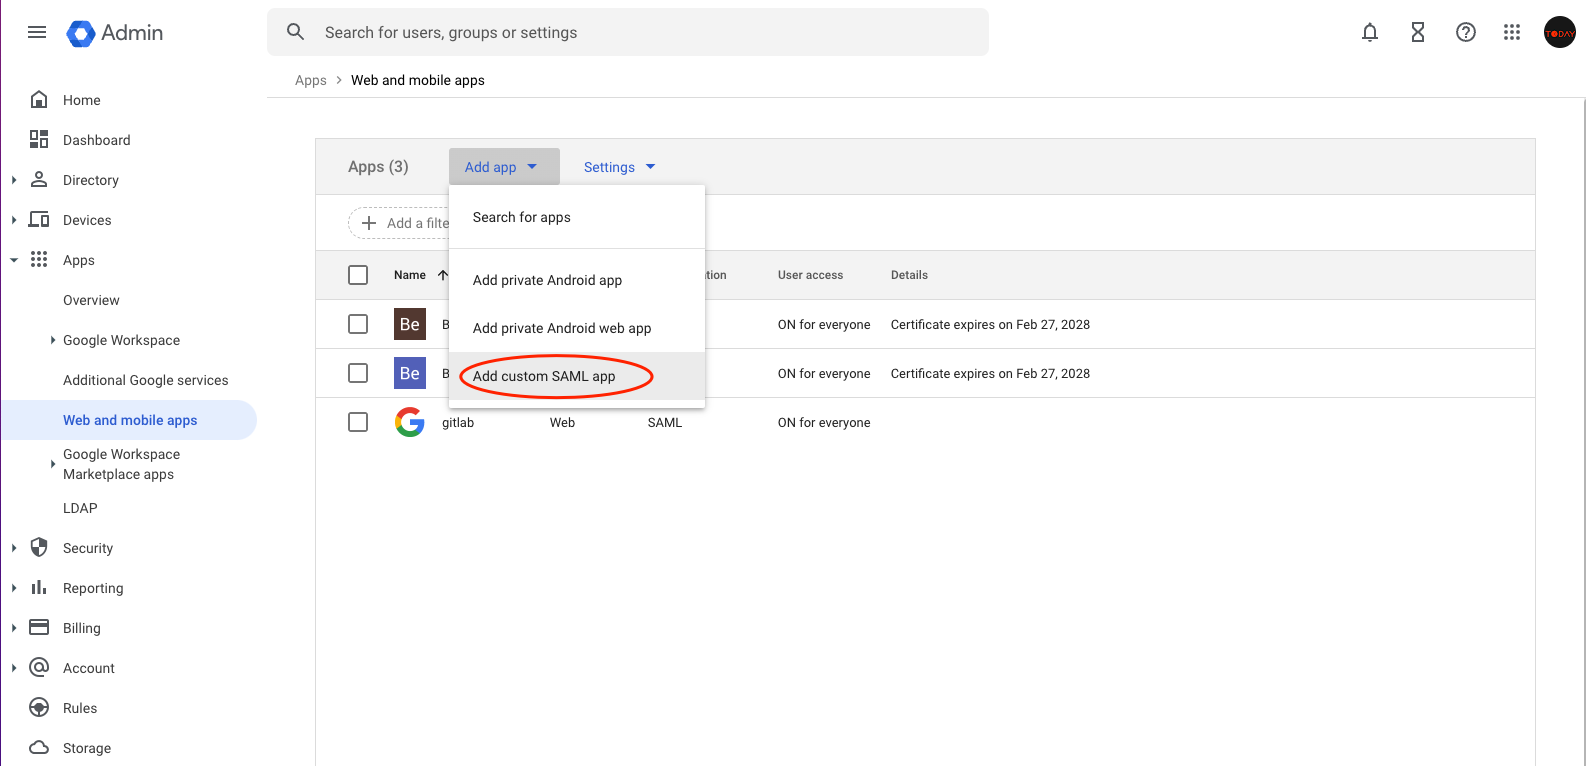
# 3. Click Add App Add custom SAML app
# 4. On the App Details page:
- Enter the name of the custom app.
- (Optional) Upload an app icon. You should also upload the Bees360 logo from here.
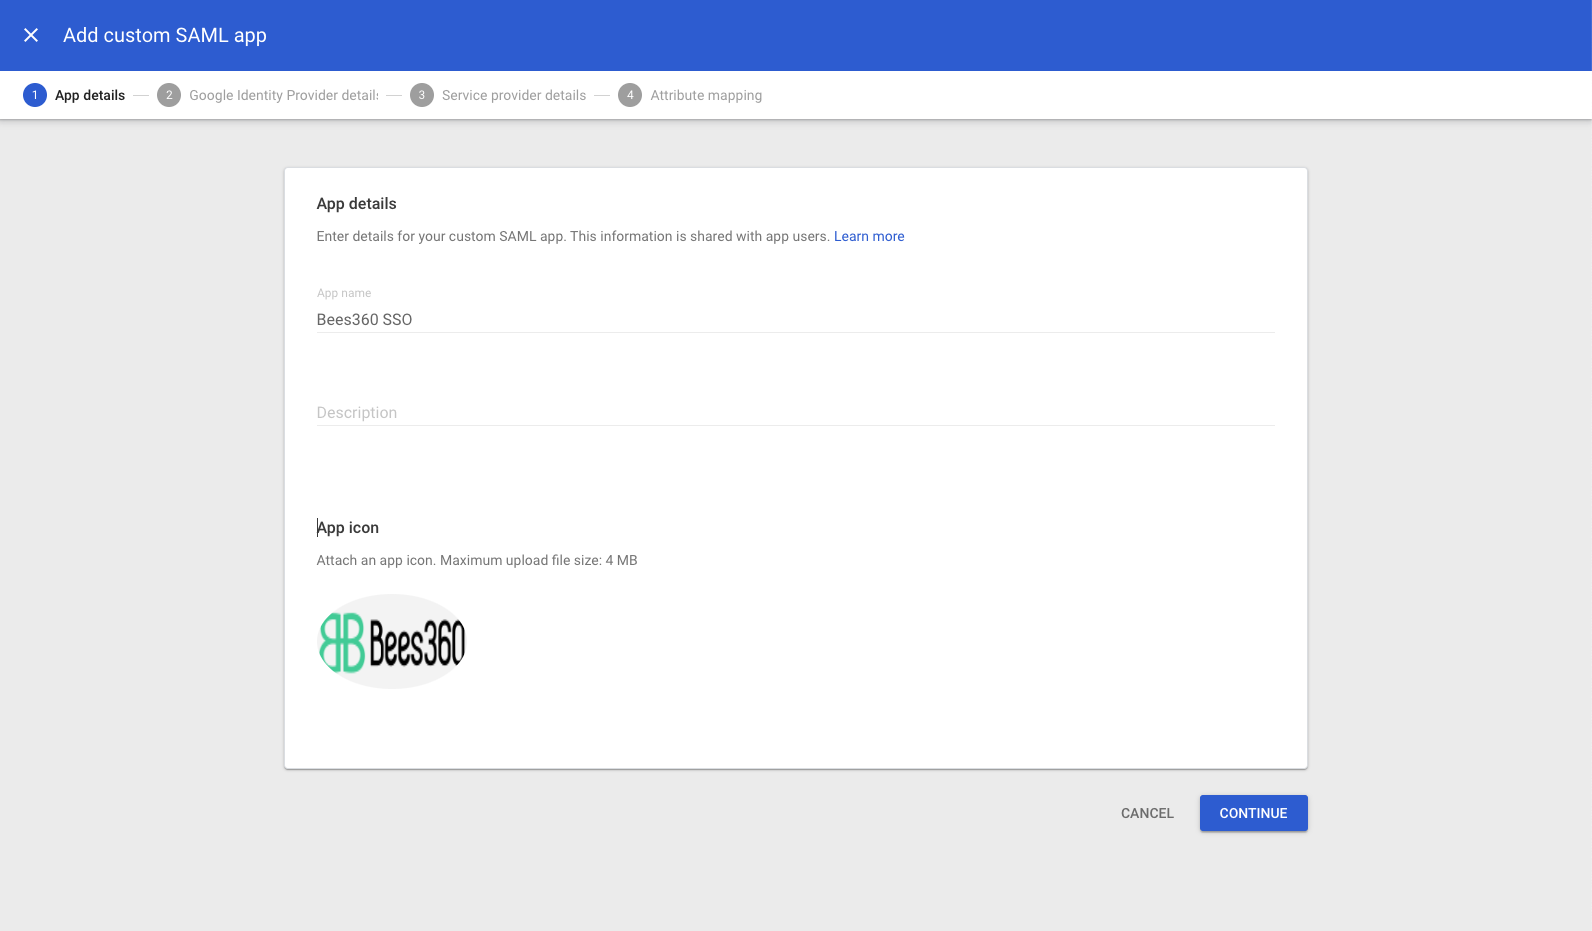
# 5. Click Continue.
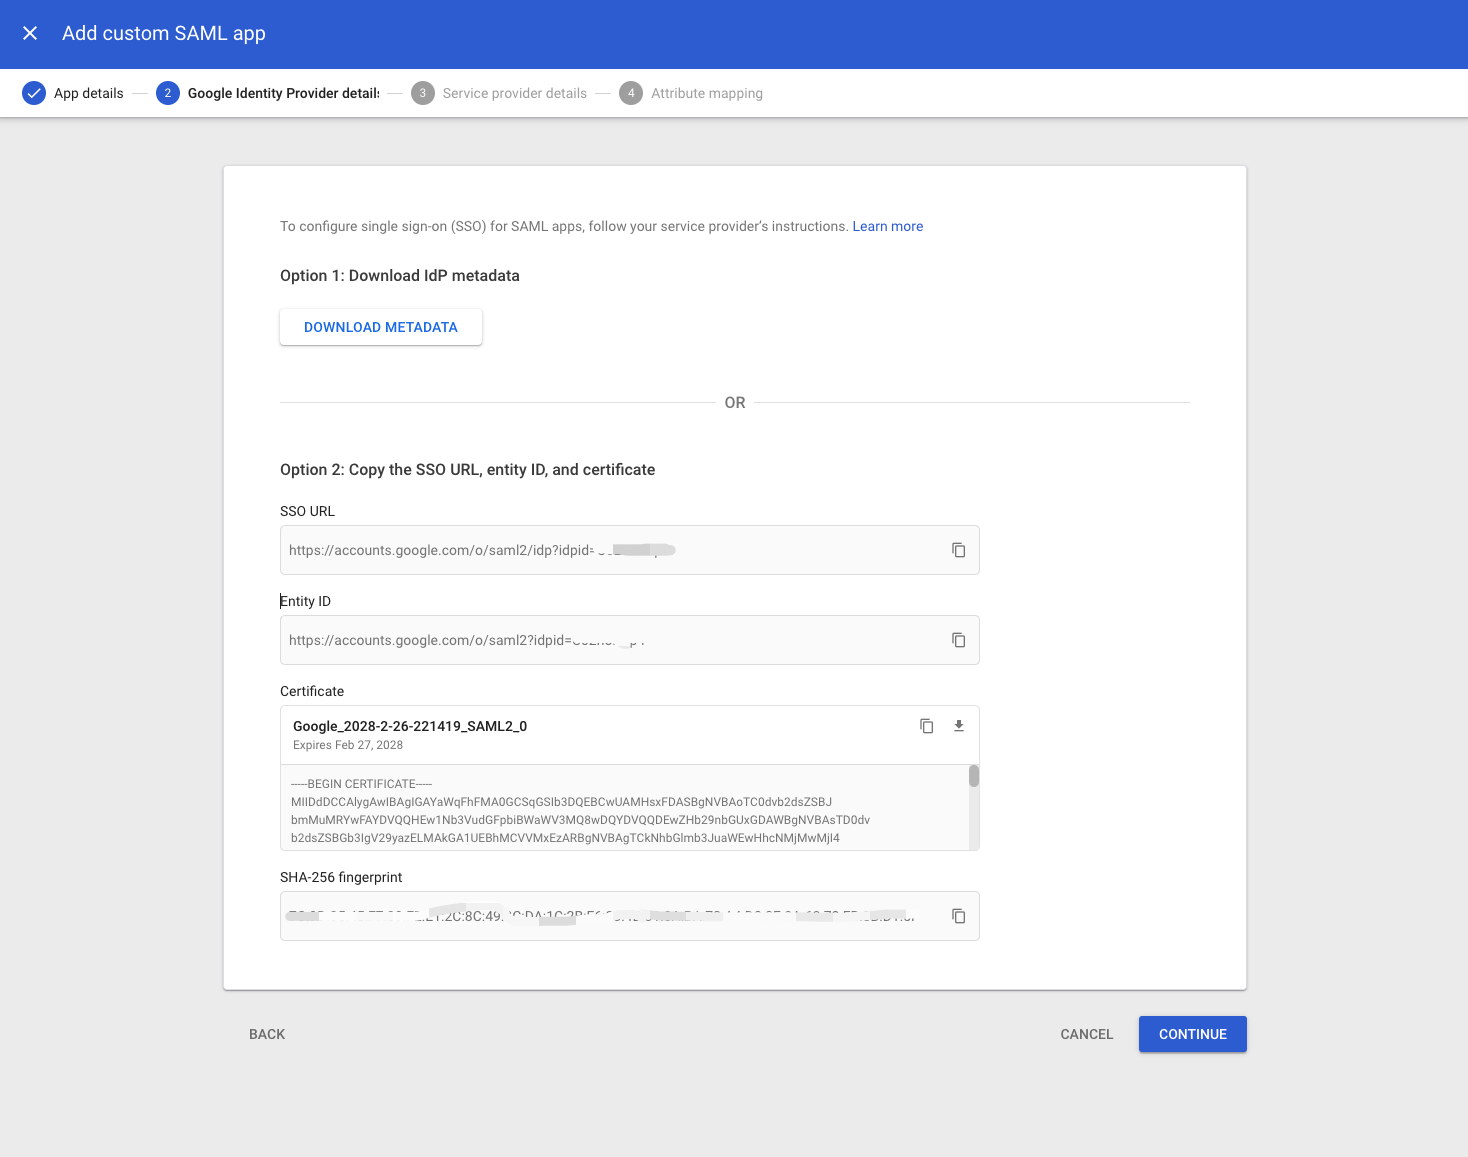
# 6. On the Google Identity Provider details page, get the setup information needed by the service provider using one of these options:
- Download the IDP metadata.
- Copy the SSO URL and Entity ID and download the Certificate
# 7. Configure your IdP Metadata into the SSO Profile created in Bees360
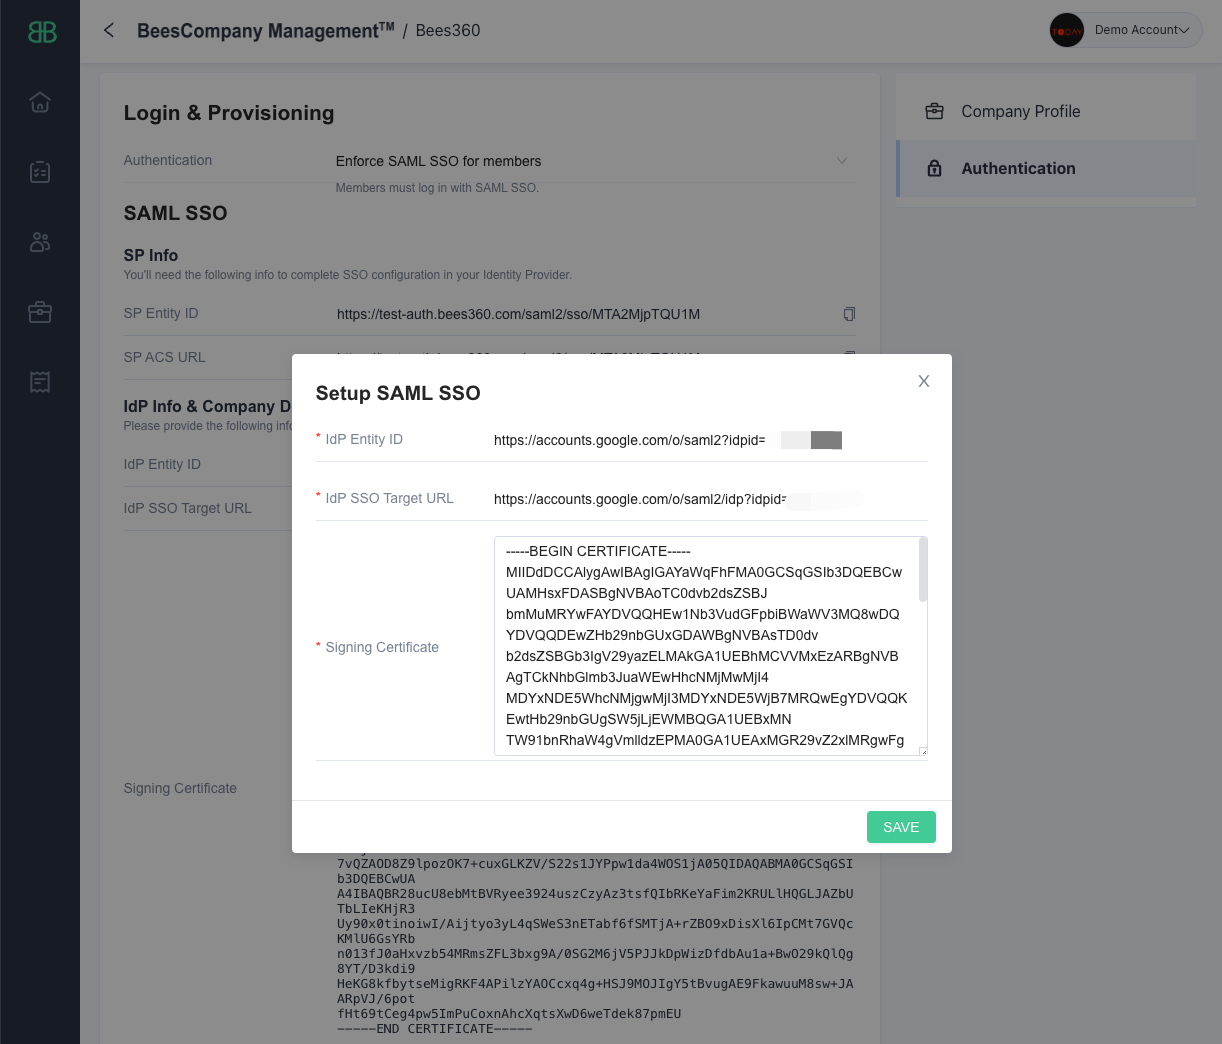
Go to the tab where you have the Bees360 SSO Profile opened. To configure the 'IdP Info' settings, follow the below process
- Paste the 'Entity ID' value from Google IdP metadata in the 'IdP Entity ID' field of Bees360 IdP Info
- Paste the 'SSO URL' value from Google IdP metadata in the 'IdP SSO Target URL' field of Bees360 IdP Info
- Paste the 'Certificate' value from Google IdP metadata in the 'Signing Certificate' field of Bees360 IdP Info

After configuring these 3 values from your Google Application into the Bees360 SSO Profile, click the ‘Save’ button to save the SSO Profile, then return to the Google Admin console.
# 8. Click Continue.
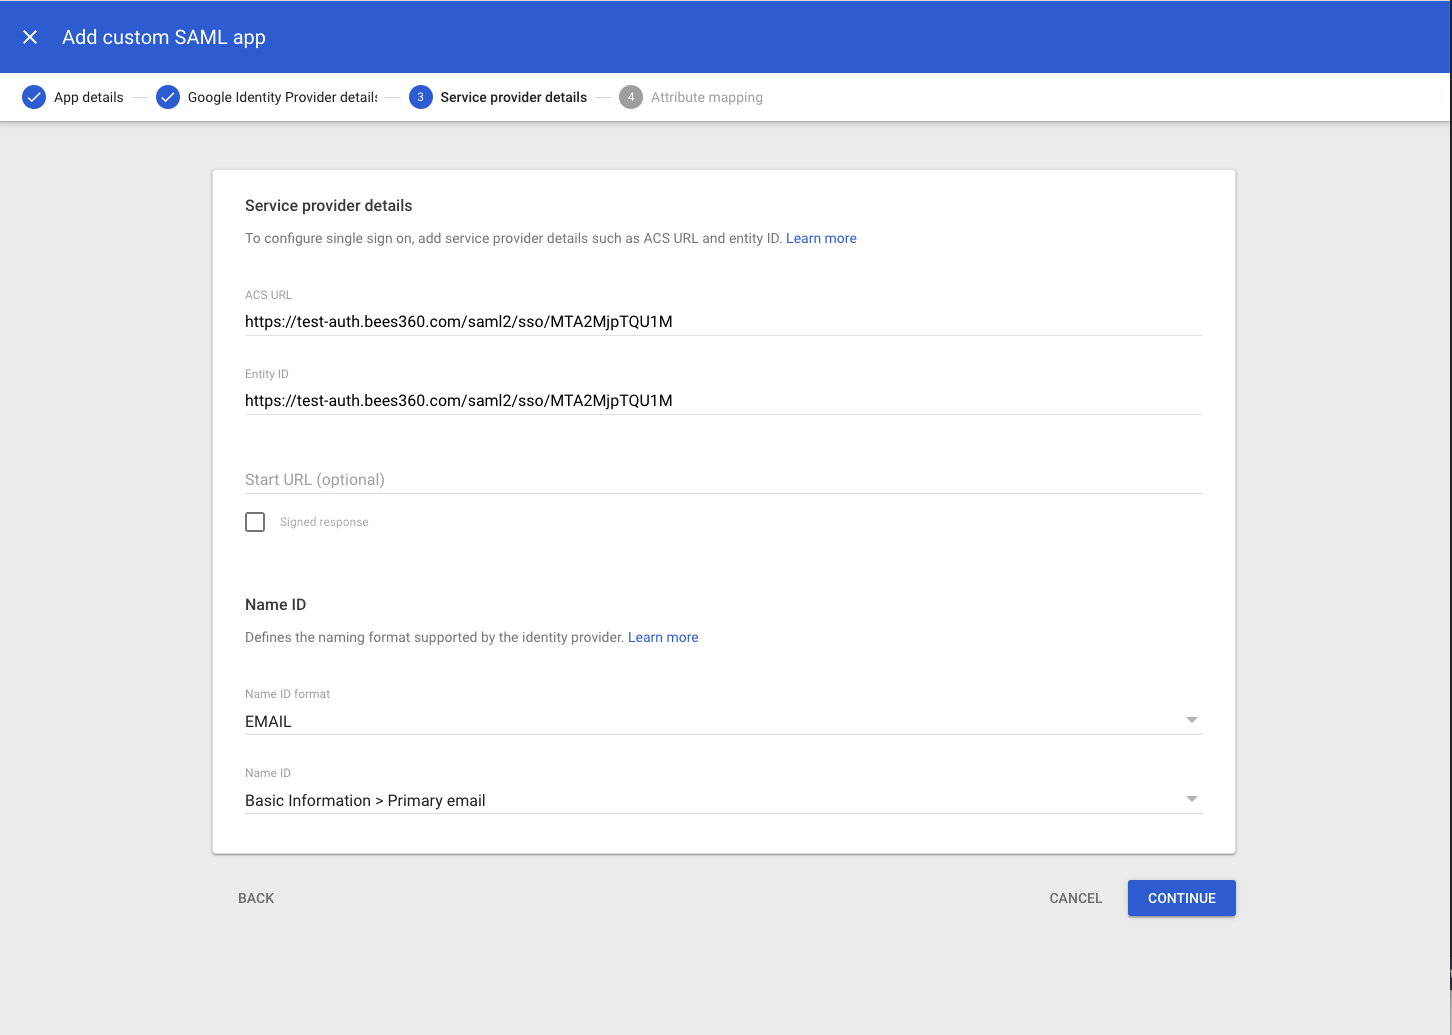
# 9. In the Service Provider Details window, enter:
- Entity ID: 'SP Entity ID' value from Bees360 SSO Profile
- ACS URL: 'SP ACS URL' value from Bees360 SSO Profile
- Start URL: [EMPTY]
- Signed Response: [EMPTY]
- Name ID format: Email
- Name ID: Basic Information -> Primary Email
# 10. Click Continue
# 11. On the Attribute mapping page, you can simply click ‘FINISH’ without entering anything.
# Step 3: Turn on your SAML app
- Sign in to your Google Admin console.
- In the Admin console, go to Menu
- Select your SAML app.
- Click User access.
- To turn service on or off for everyone in your organization, click On for everyone or Off for everyone, and then click Save.
# Additional Resources
Google's documentation for creating a SAML App Integration
# Configuring Azure Active Directory with Bees360 SSO
# Step 1: Create a new SSO Profile in Bees360 Company Setting
Click Avatar , go to Company Setting, and click on the Authentication option in the navigation bar as shown below
Create a new SSO Profile by selecting the ‘SAML SSO’ option. You will land on the below screen where you can copy the SP Metadata.
Keep this tab open as you will need to copy and paste the Entity ID and Single Sign On URL values in Azure Active Directory
# Step 2: Create a new Enterprise Application for your Azure Active Directory
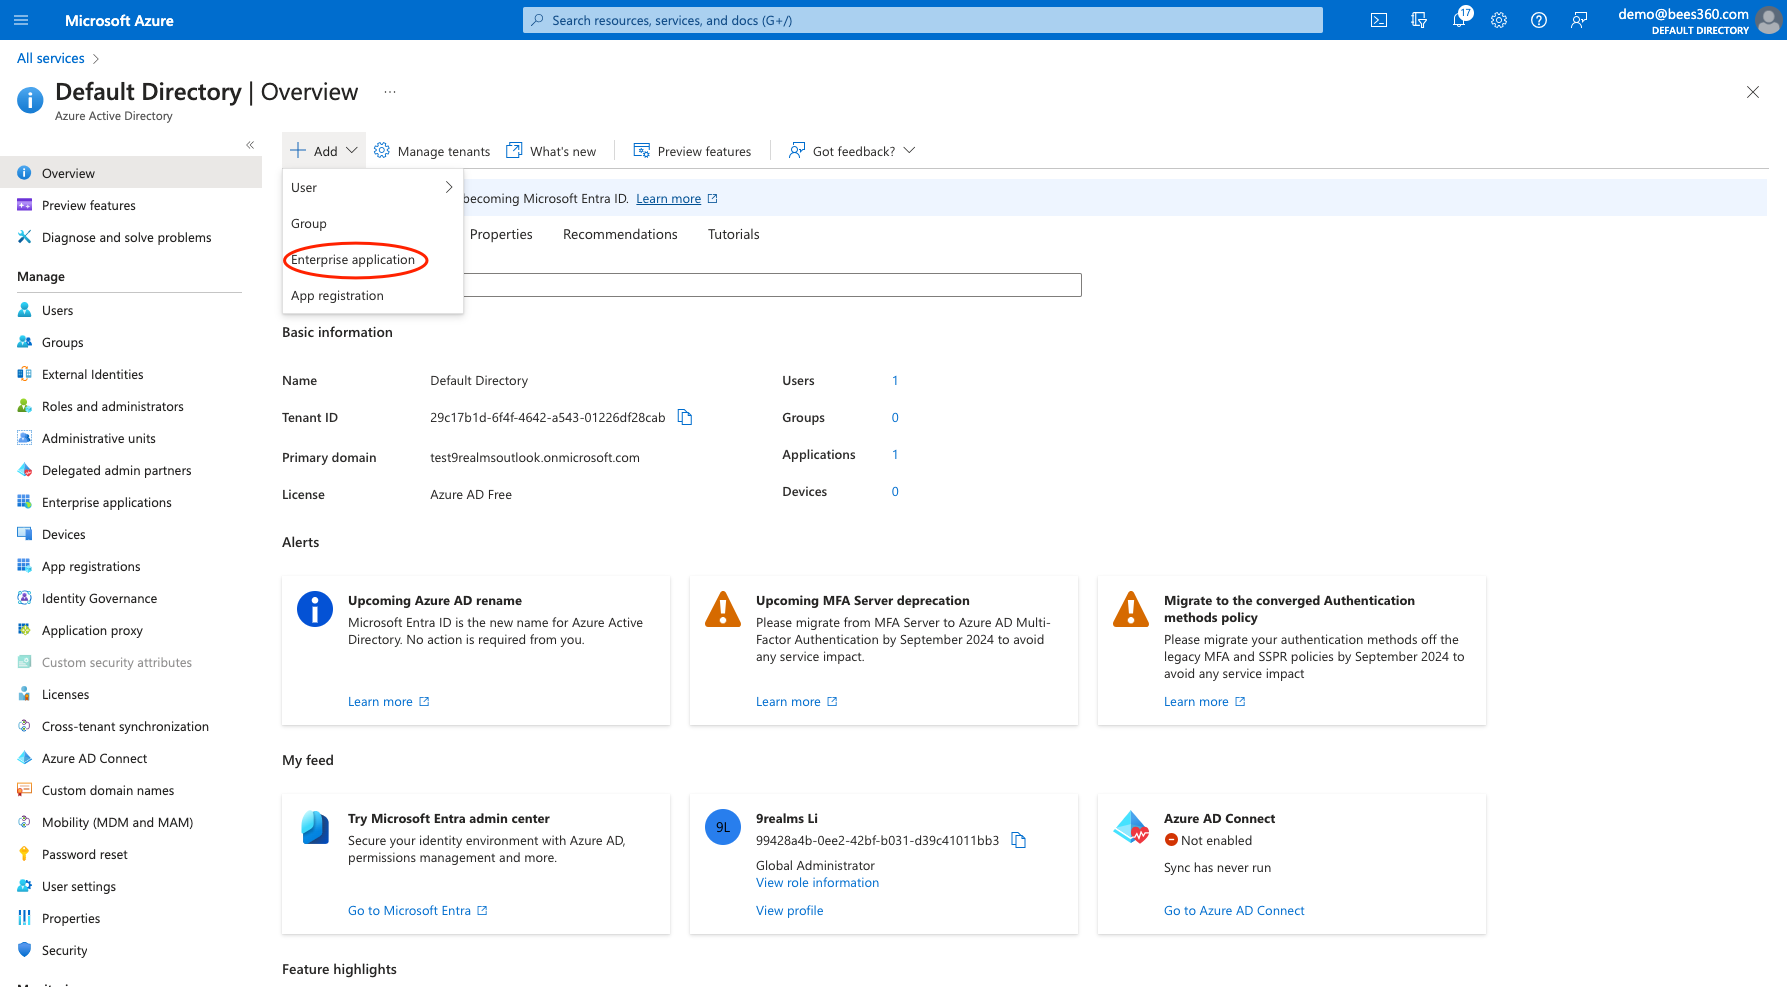
After logging into your Azure portal go to Azure Active Directory(Microsoft Entra ID), click on 'Add' and select 'Enterprise Application' from the dropdown
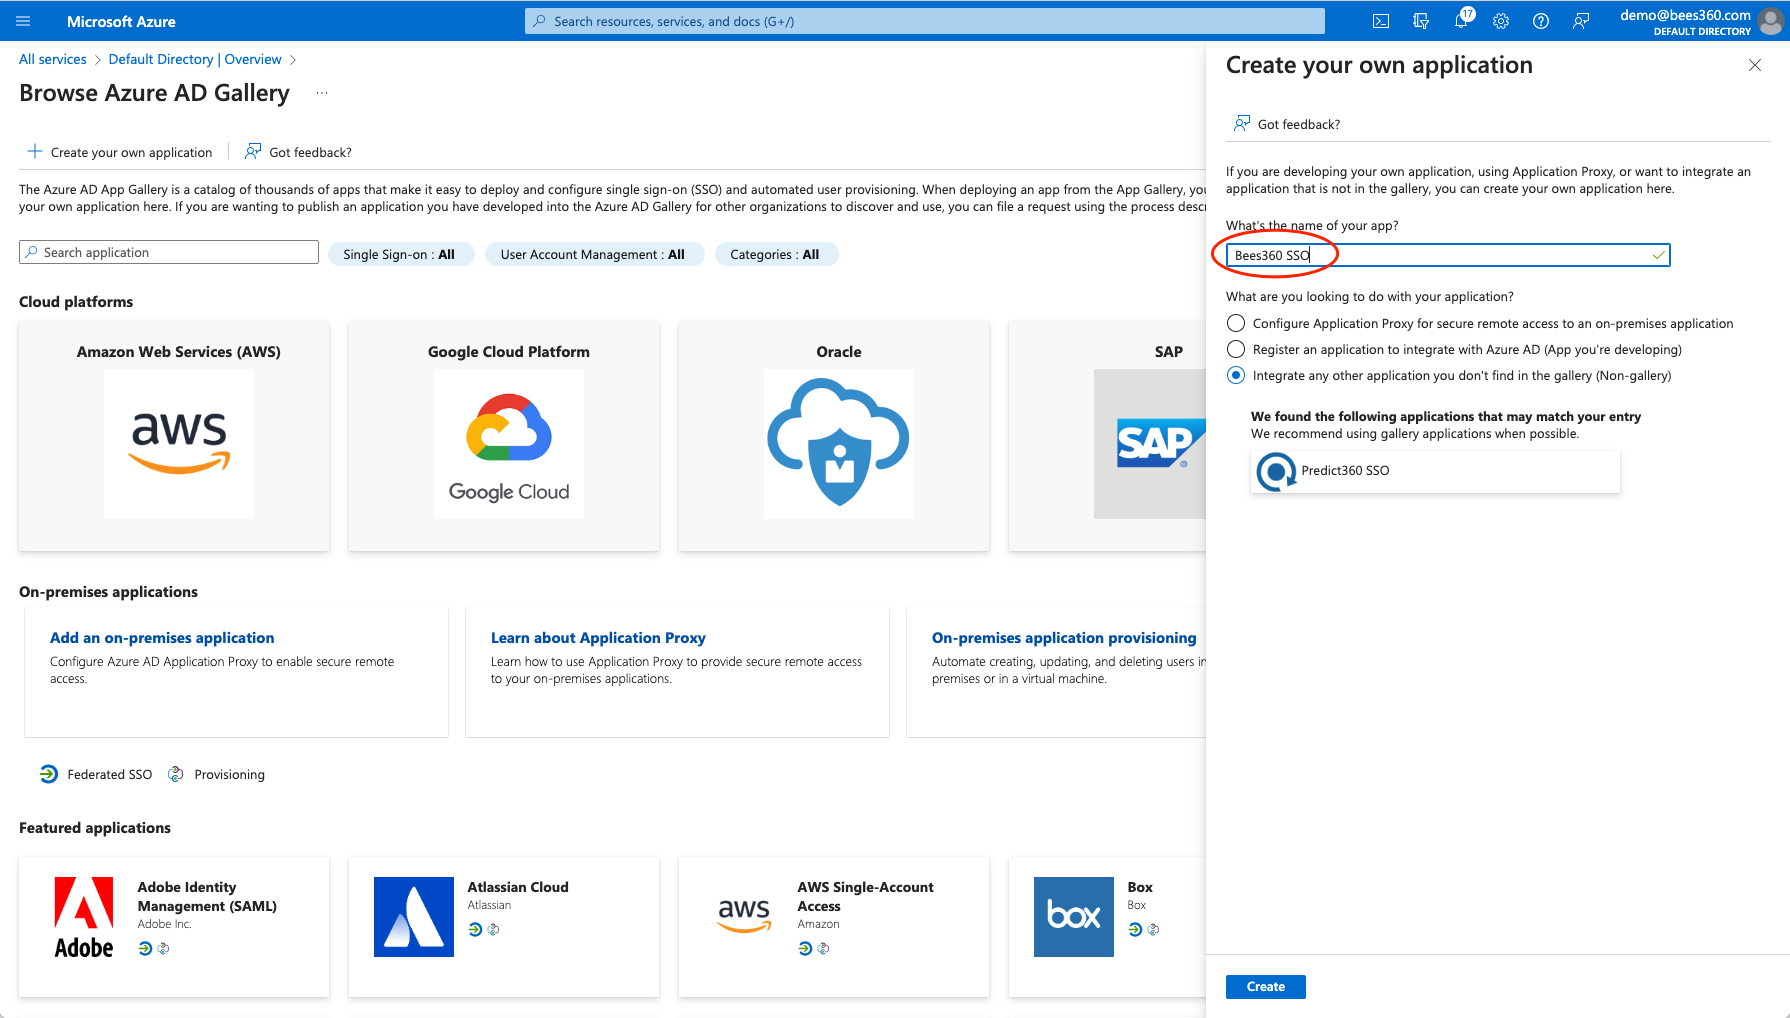
Select 'Create your own Application' on the next Screen.
Enter a name for identifying this new application and select the option ‘Integrate any other application you don’t find in the gallery (Non-gallery)’.
# Step 3: Configure the Bees360 as SP Metadata in the created enterprise application
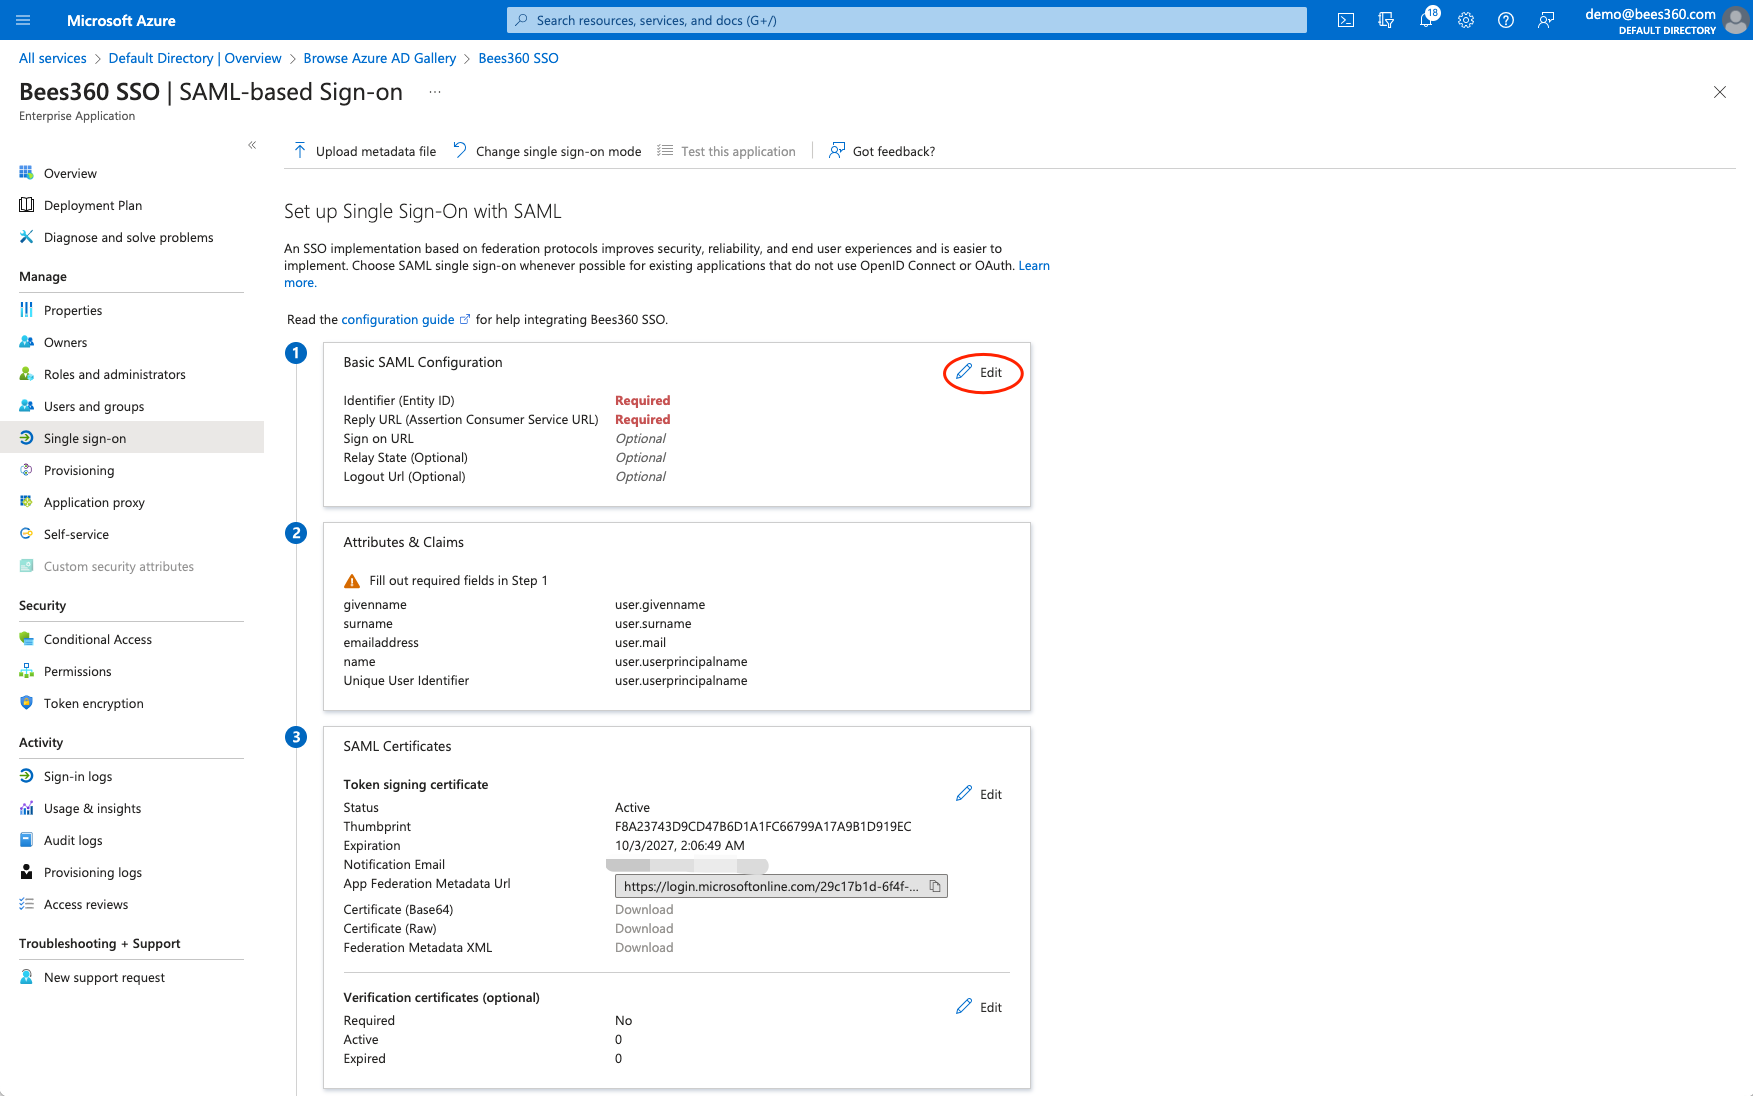
Once you have created an Enterprise App, the next step is to configure this application to connect with Bees360 for SSO. For this click on the ‘Set up single sign on’ link and then select ‘SAML’ as the single sign on method.
After selecting SAML, you will see a screen as shown below. This is where we will configure the Bees360 as SP metadata. Click on the ‘Basic SAML Configuration’ edit button as shown below.
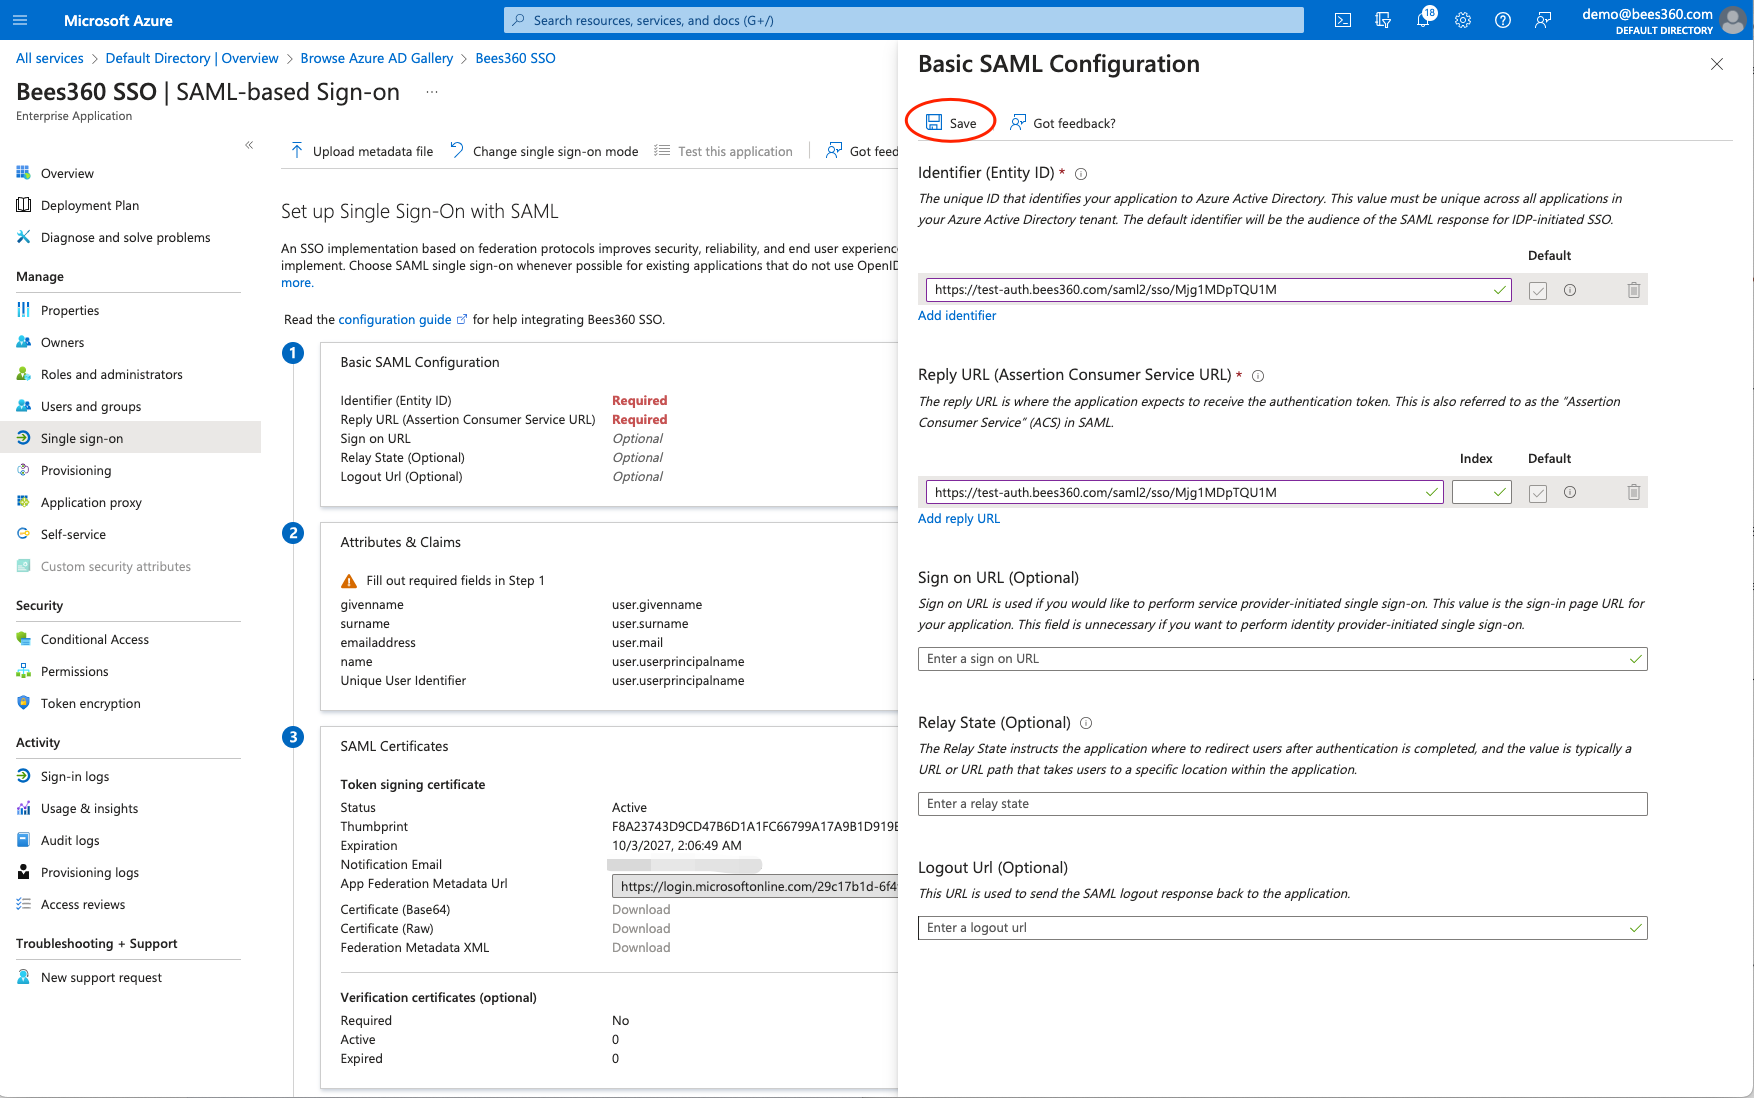
To configure the Basic SAML Configuration settings, please copy and paste the values for 'Identifier (Entity ID)' and 'Reply URL (Assertion Consumer Service URL)' from the other tab where you have the SSO Profile in Bees360 Company Setting.
- Paste the 'SP Entity ID' value from Bees360 SSO Profile in the 'Identifier (Entity ID)' field of Basic SAML Configuration
- Paste the 'SP ACS URL' value from Bees360 SSO Profile in the 'Reply URL (Assertion Consumer Service URL)' field of Basic SAML Configuration
Hit the save button to save these values.
Next you need to configure the Signing Option and NameID settings.
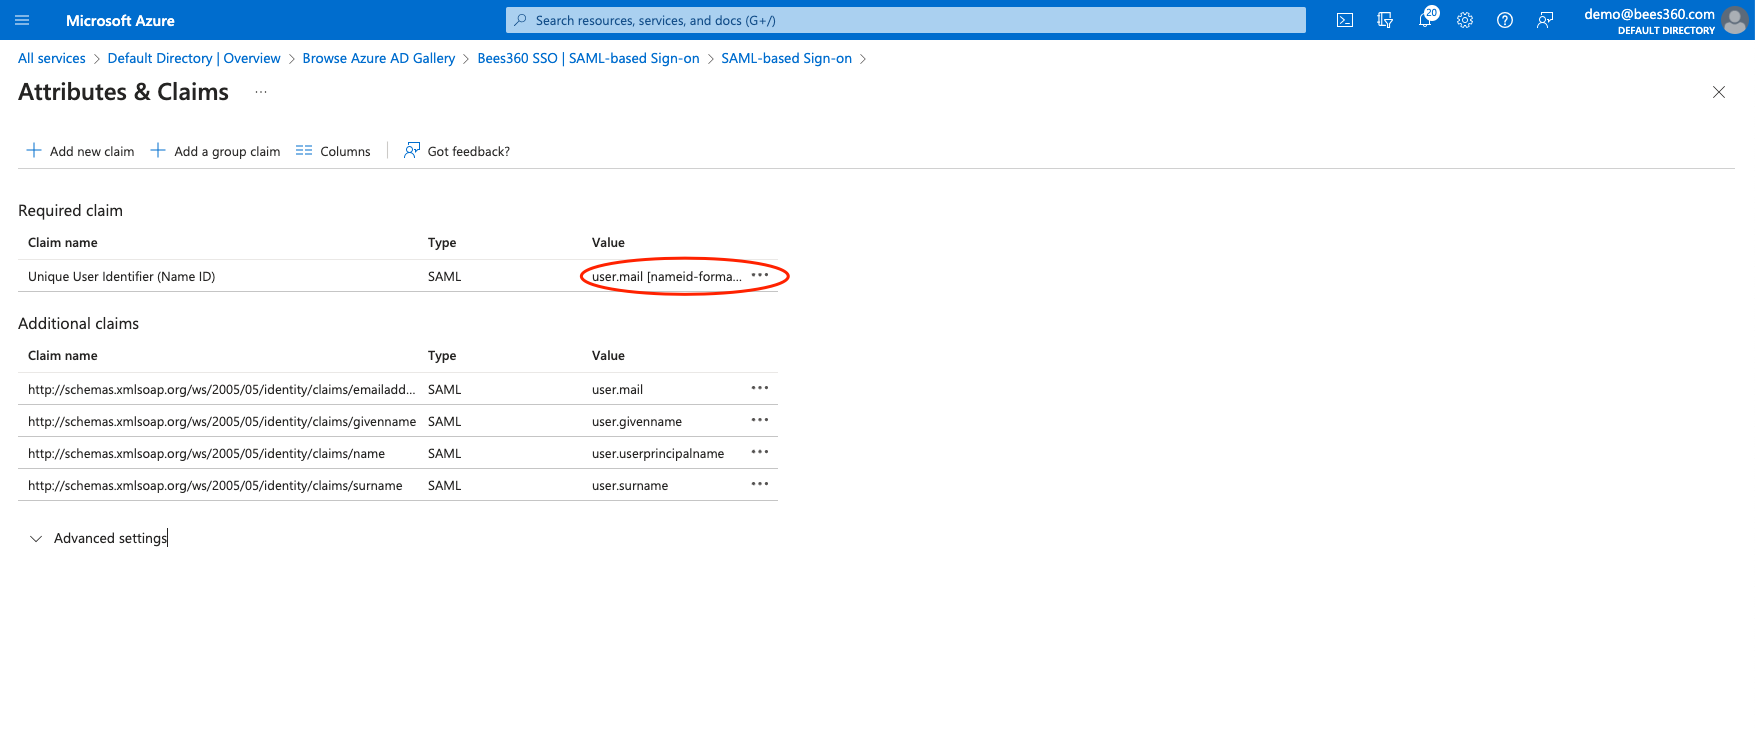
- For NameID, click edit on ‘Attributes & Claims’. On the screen as shown below you’ll see the Unique User Identifier(Name ID) claim. Confirm that the value is set to the user’s email address attribute as per your directory and the format should be EmailAddress.
- It is critical to ensure that the value of the Name ID claim should match exactly with the email address that your users will be signing up with in Bees360.
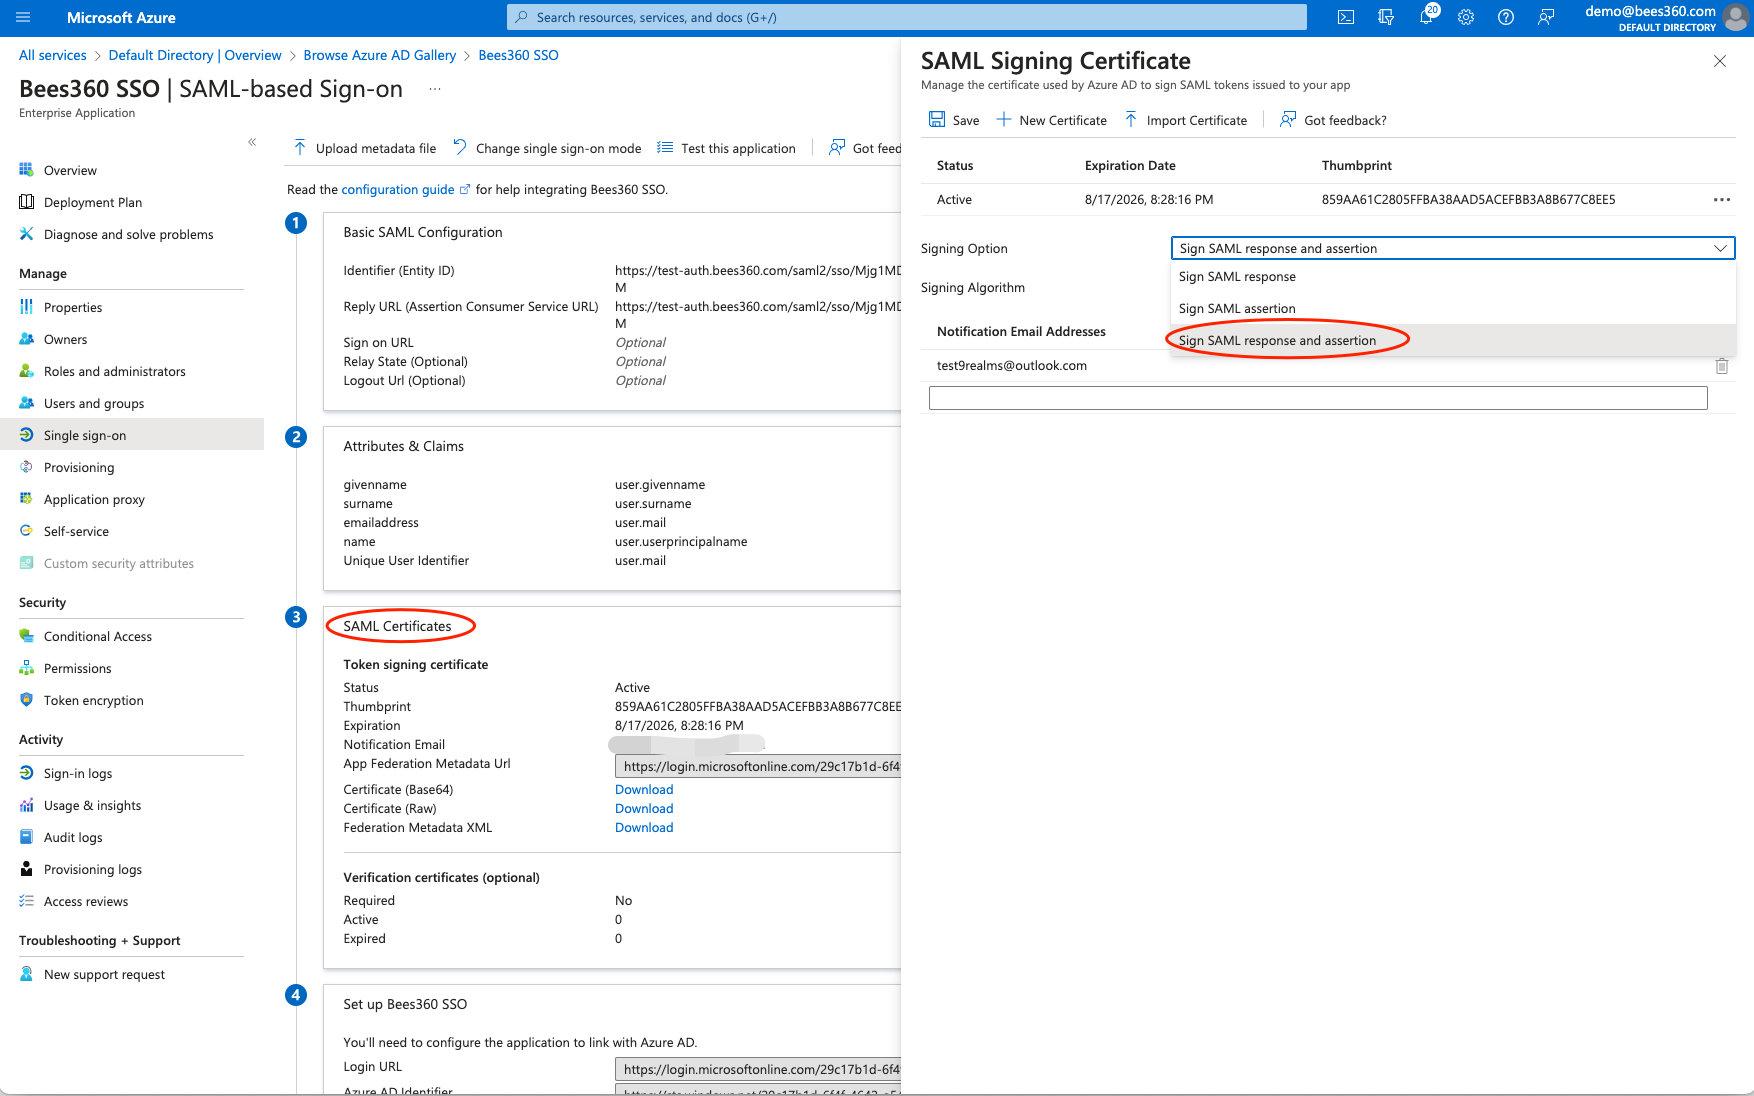
- For the Signing Option, go to the SAML Signing Certificate settings and click Edit. You will see the below page. Here select the option 'Sign SAML response and assertion' and save.
Once the NameID and Signing Option are configured correctly, you are done with the configurations in your IdP and can now proceed to Configuring the IdP metadata into Bees360.
# Step 4: Configure your IdP Metadata into the SSO Profile created in Bees360
Go to the tab where you have the Bees360 SSO Profile opened.
To configure the 'IdP Info' settings, you will need to copy the values of Azure AD Identifier and Login URL from your Enterprise Application into the Bees360 SSO Profile. You will find these values in the Setup Single Sign-On page of your Enterprise Application as shown below
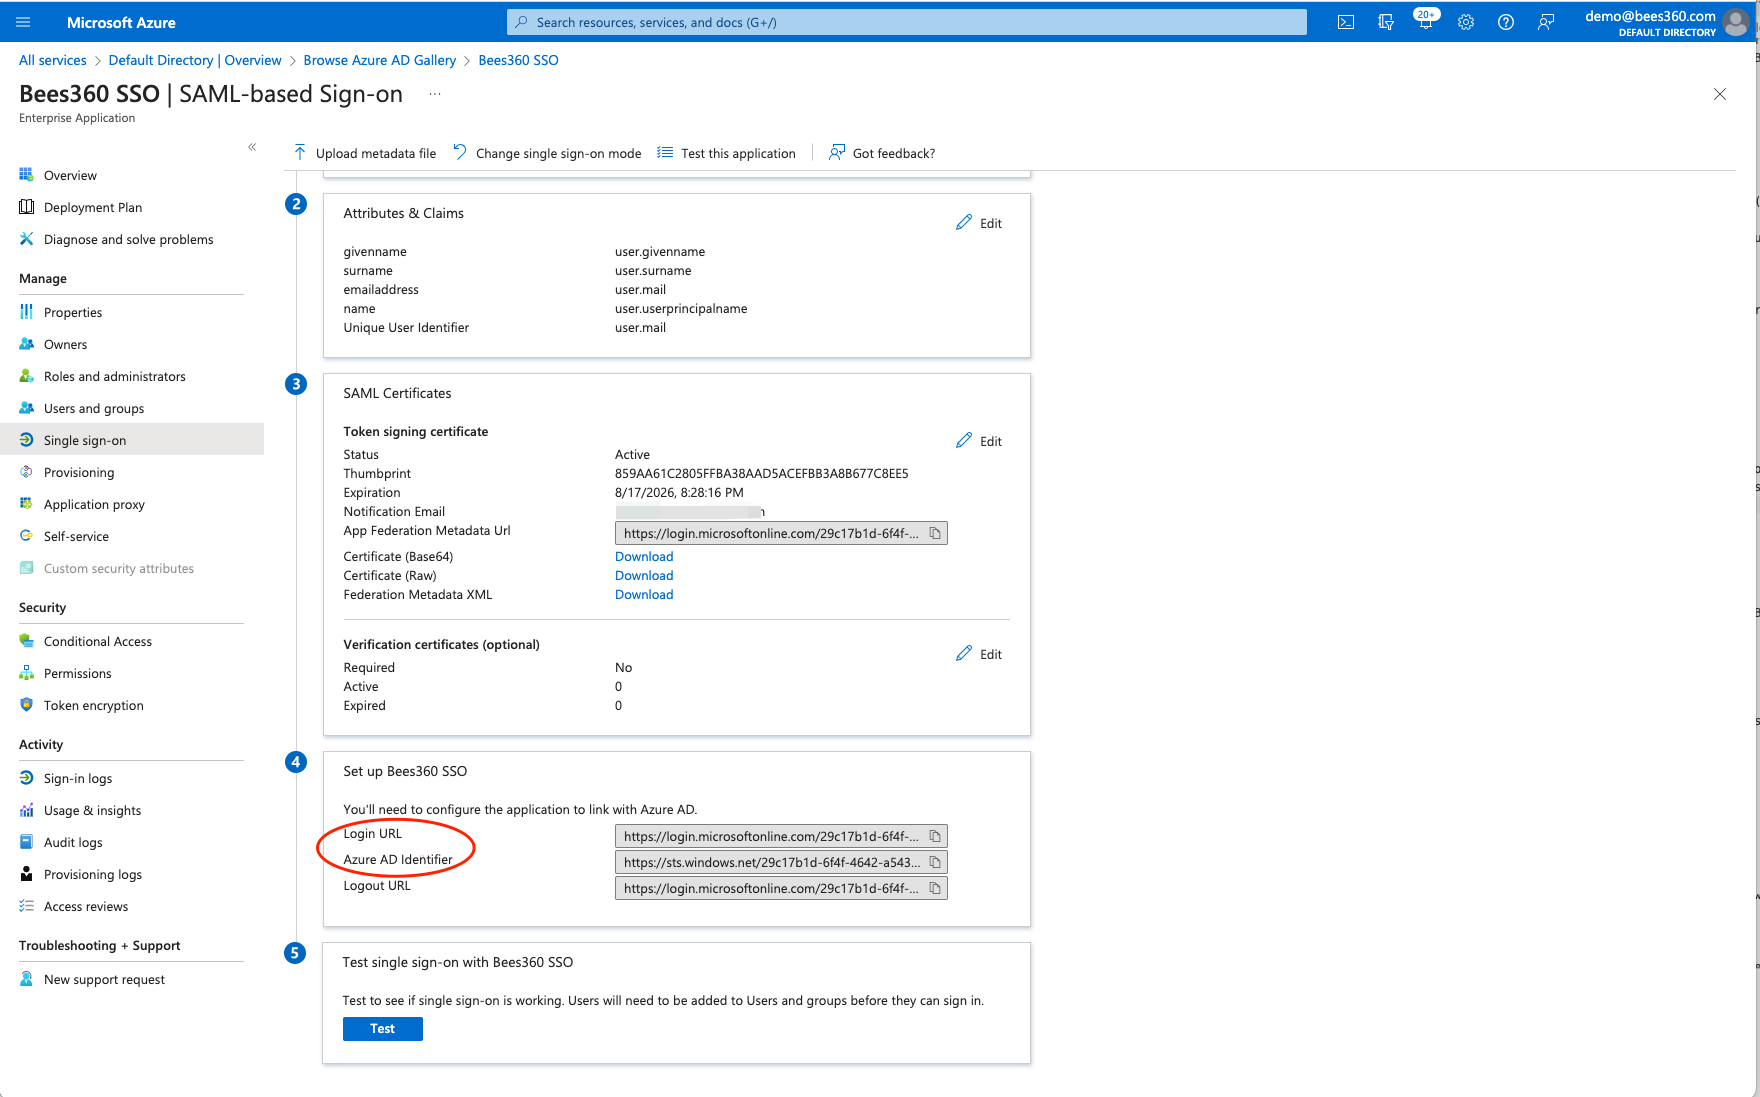
- Paste the 'Azure AD Identifier' value from Azure IdP metadata in the 'IdP Entity ID' field of Bees360 IdP Info
- Paste the 'Login URL' value from Azure IdP metadata in the 'IdP SSO Target URL' field of Bees360 IdP Info
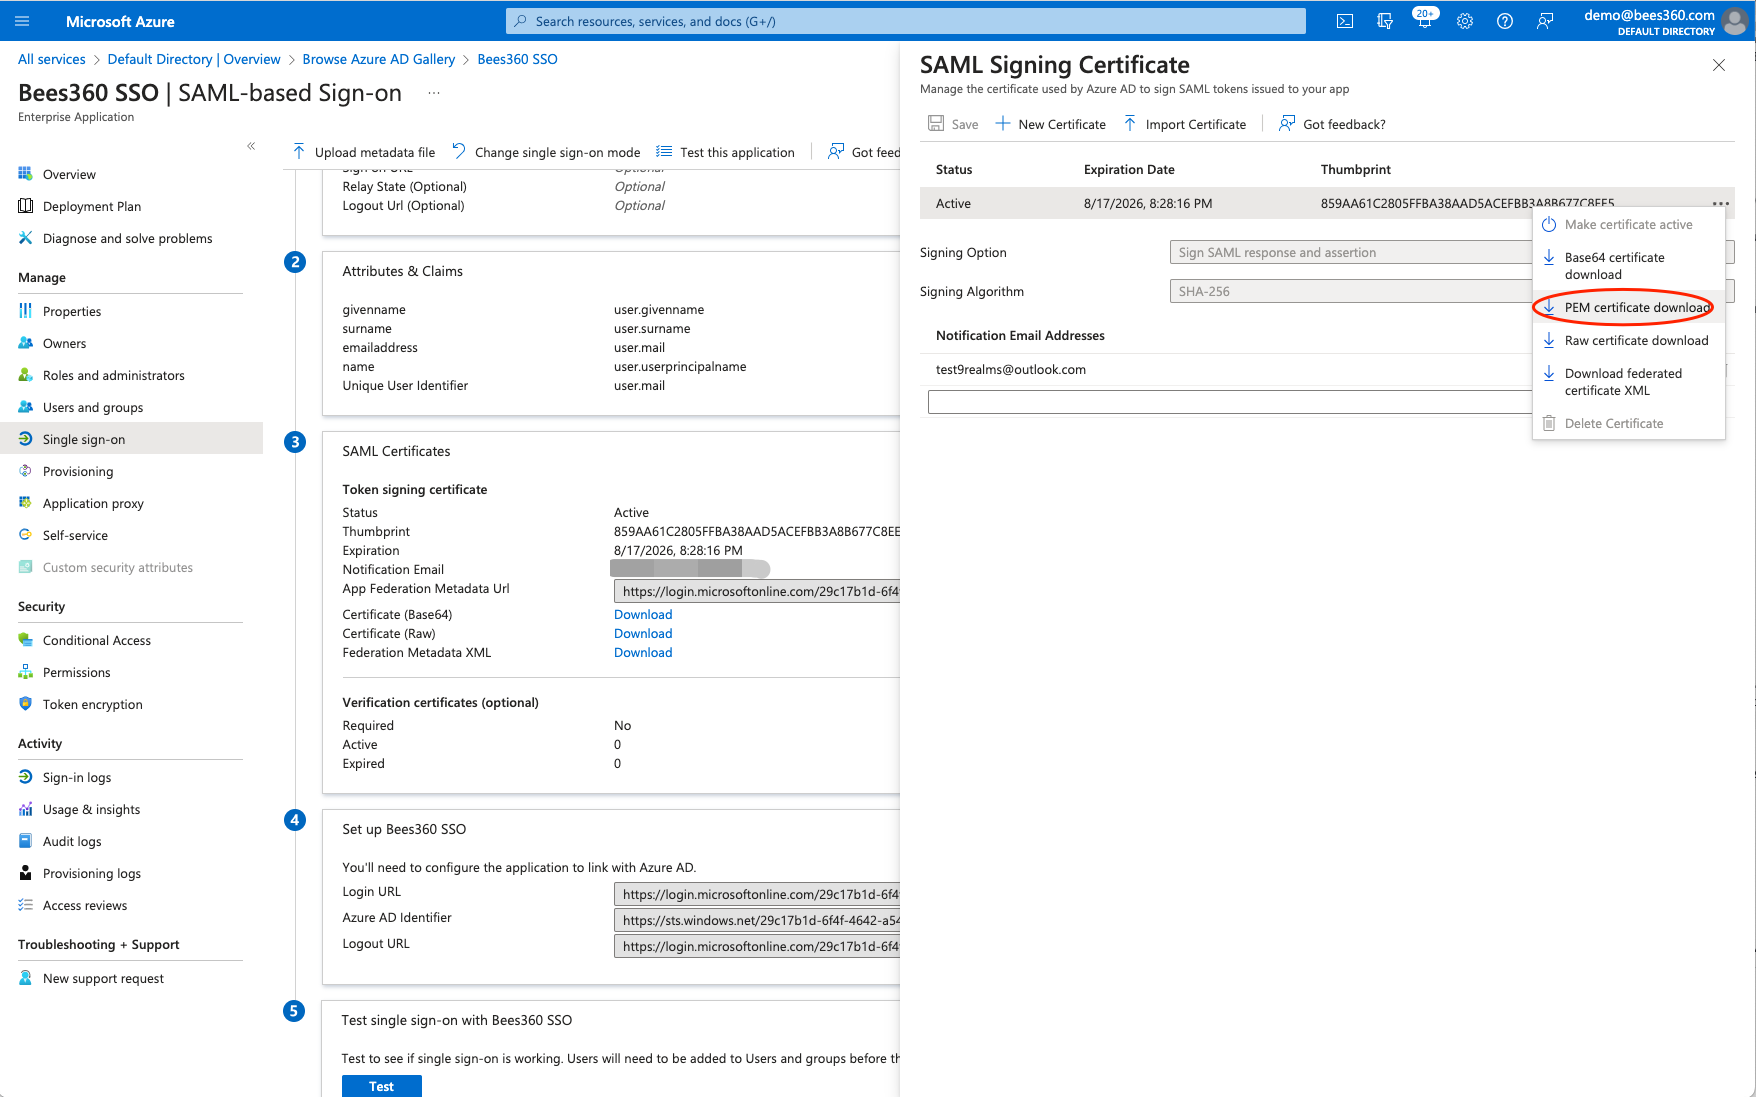
For the SAML Signing Certificate, you will need to click on the ‘Edit’ button on the SAML Signing Certificate section. Upon clicking the edit button, you will see a screen as shown below. If you have to use a specific certificate you can import or create new. Once you have the appropriate signing certificate configured, click on the three dots at the right of that certificate and download the PEM Certificate file.
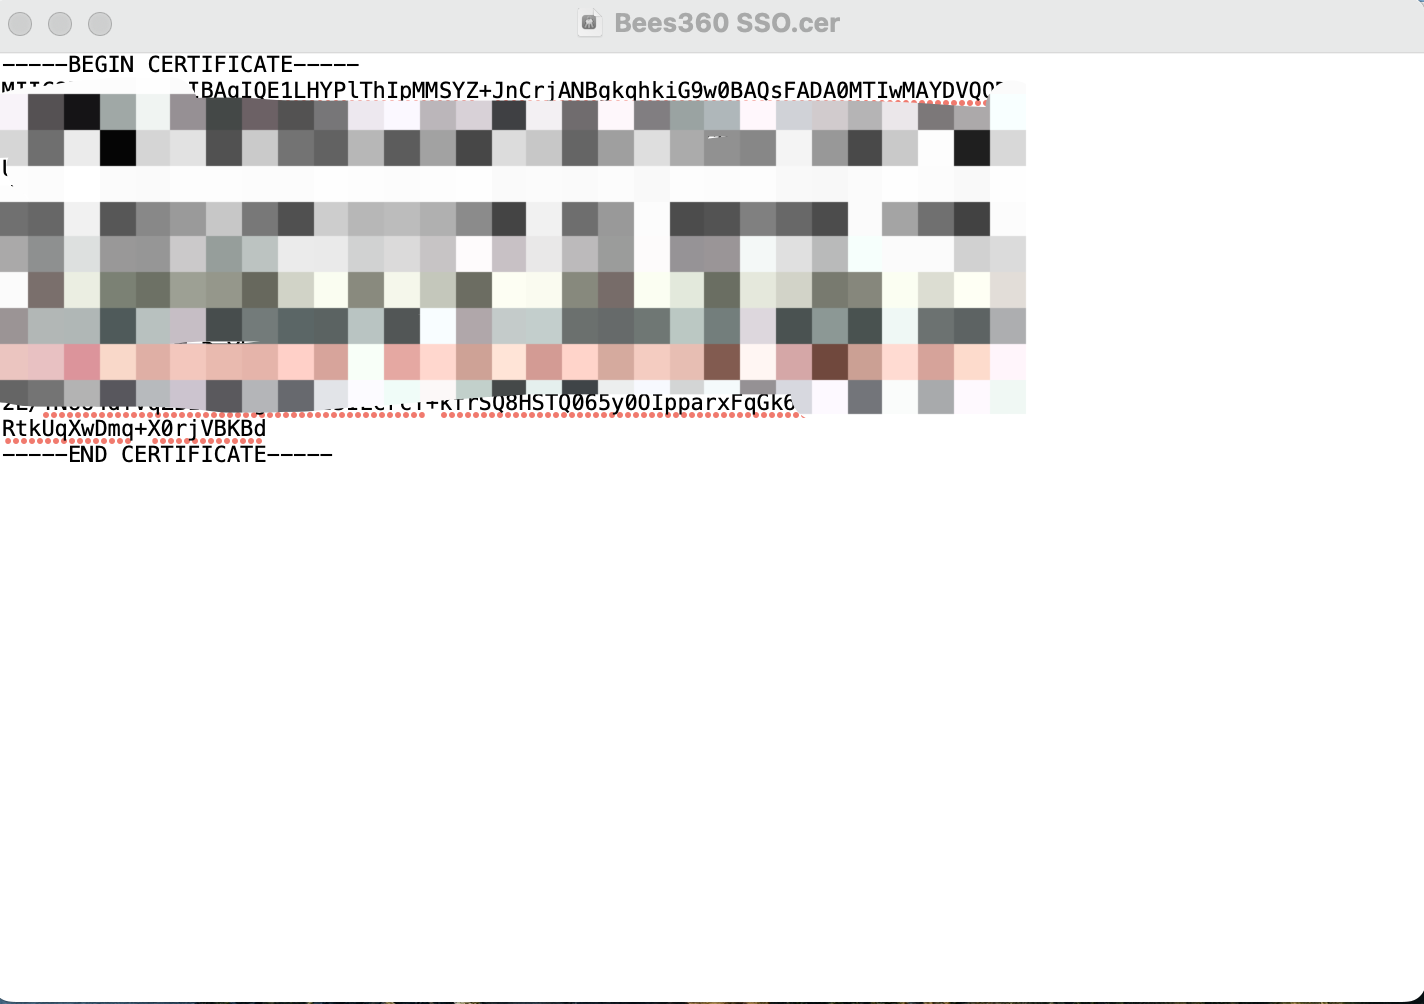
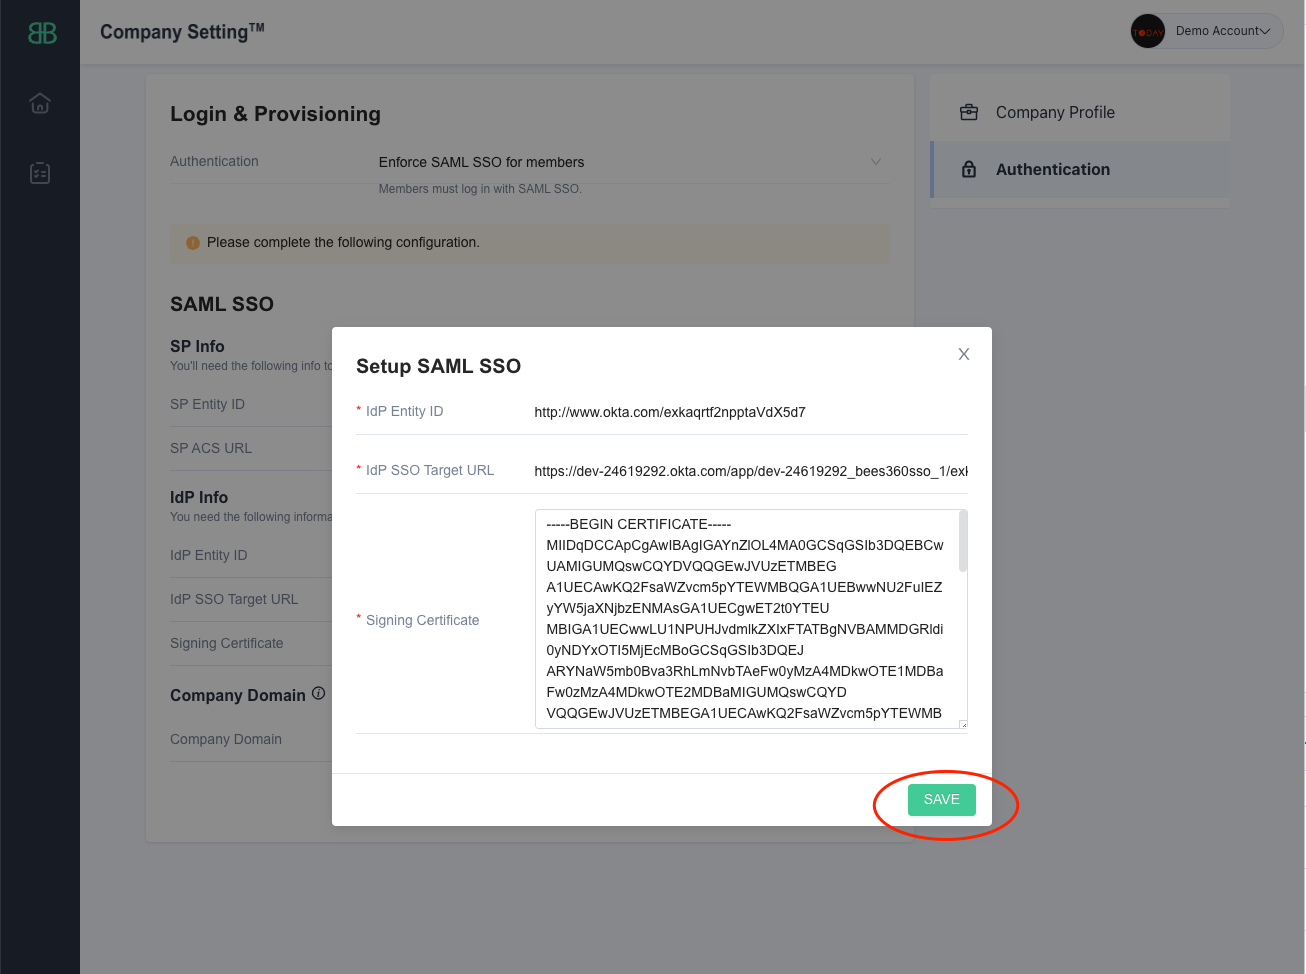
Open the downloaded certificate file in any text editor. It should look like the below screenshot. Copy the entire text (including the -----Begin Certificate----- and -----End Certificate----- part as well) and paste it into the Certificate field for the SSO Profile in Bees360.
After configuring these 3 values from your Enterprise Application into the Bees360 SSO Profile, click the ‘Save’ button to save the SSO Profile.
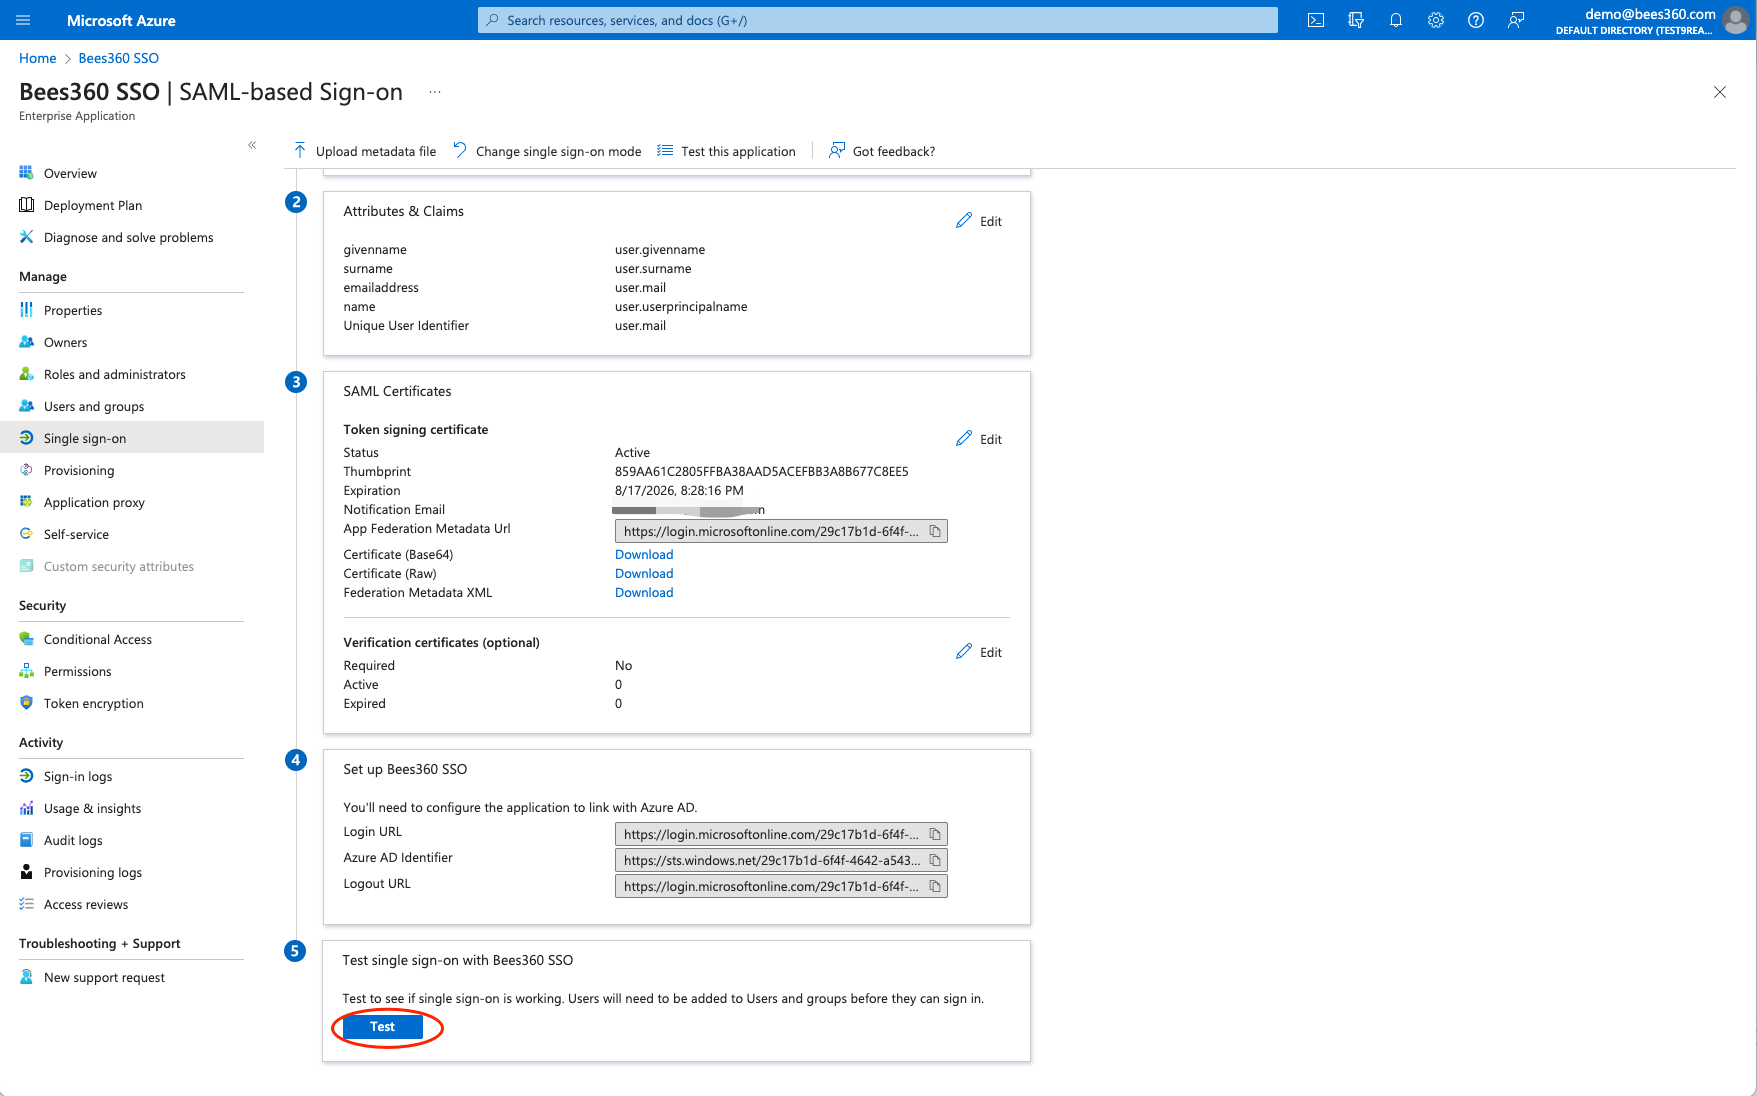
# Step5: Test single sign-on with Bees360 SSO
adding users to your Enterprise Application
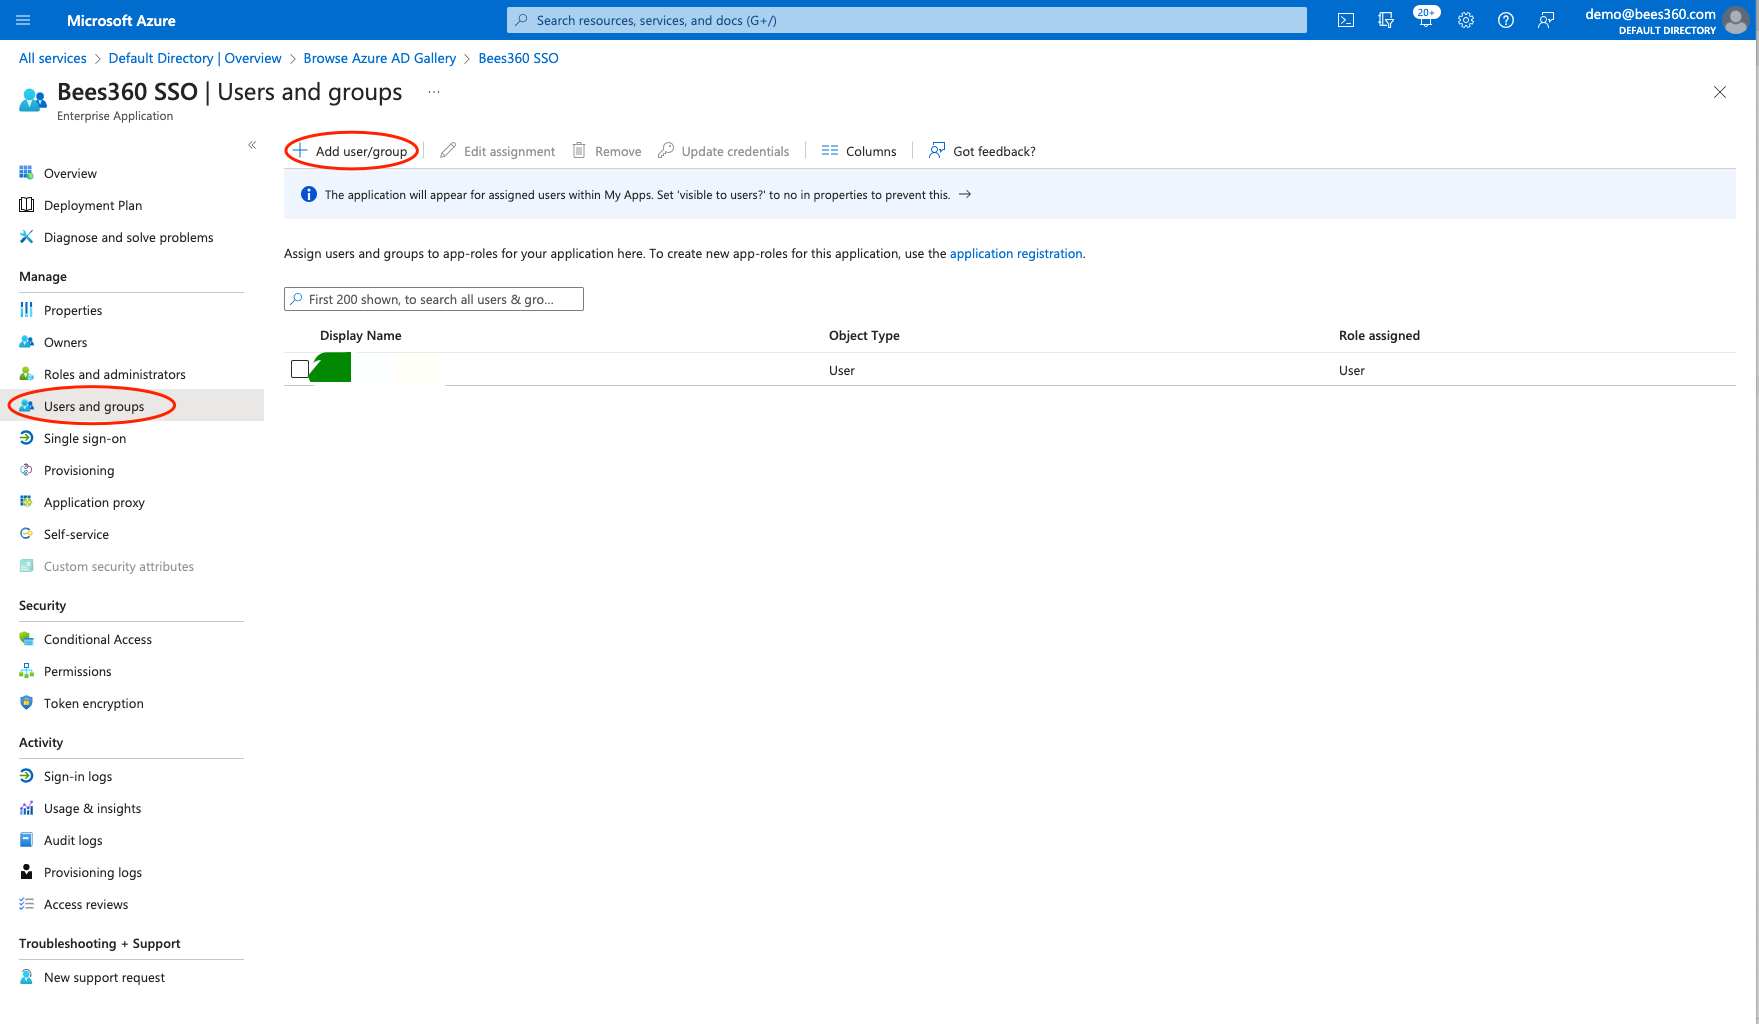
click 'Test' button to Test single sign-on with Bees360 SSO
# Configuring Okta with Bees360 SSO
# Step 1: Create a new SSO Profile in Bees360 Company Setting
Click Avatar , go to Company Setting, and click on the Authentication option in the navigation bar as shown below
Create a new SSO Profile by selecting the ‘SAML SSO’ option. You will land on the below screen where you can copy the SP Metadata.
Keep this tab open as you will need to copy and paste the Entity ID and Single Sign On URL values in Okta
# Step 2: Create a new SAML Application Integration in Okta
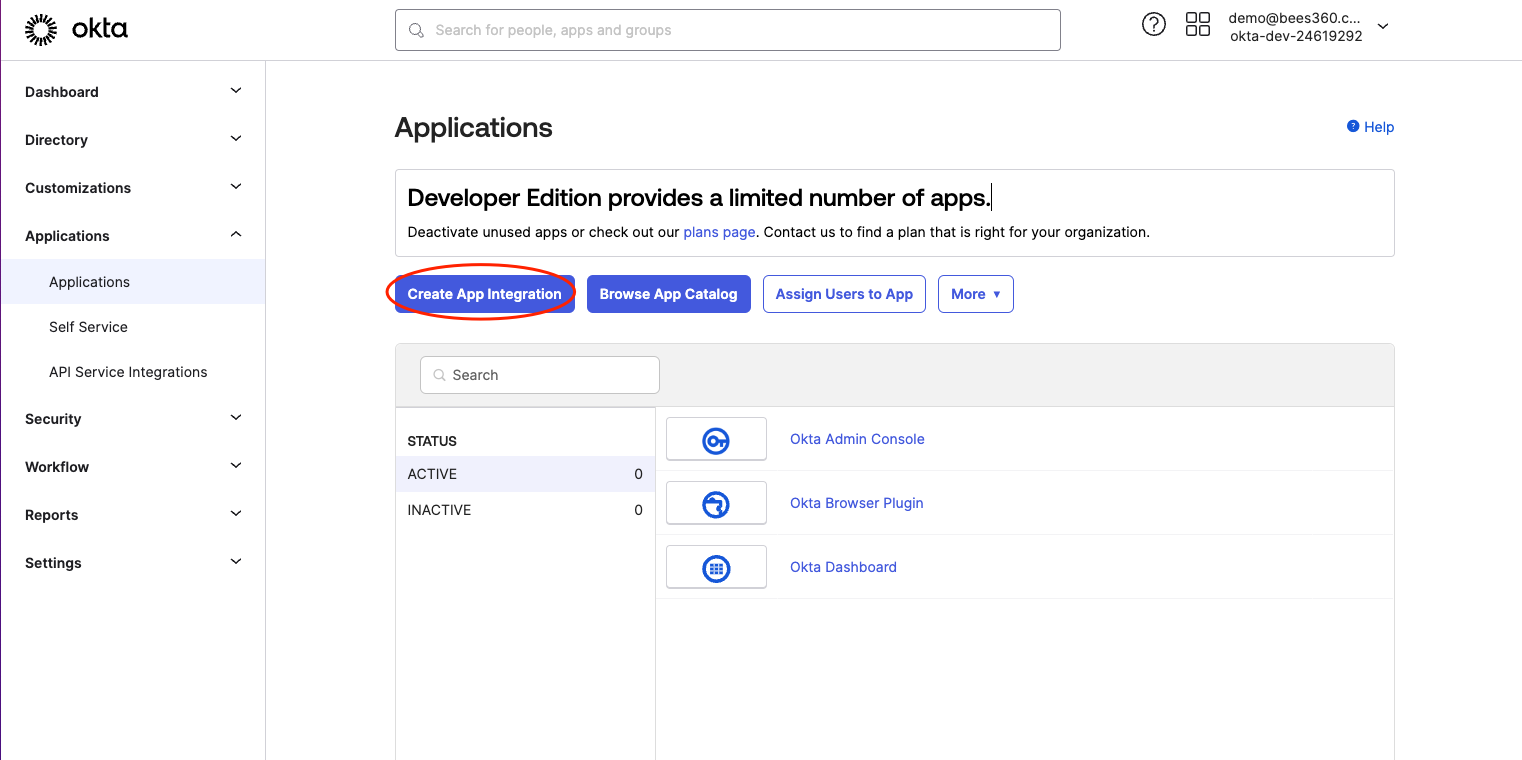
In a new tab open your Okta Admin console, go to Applications, and click on ‘Create App Integration’
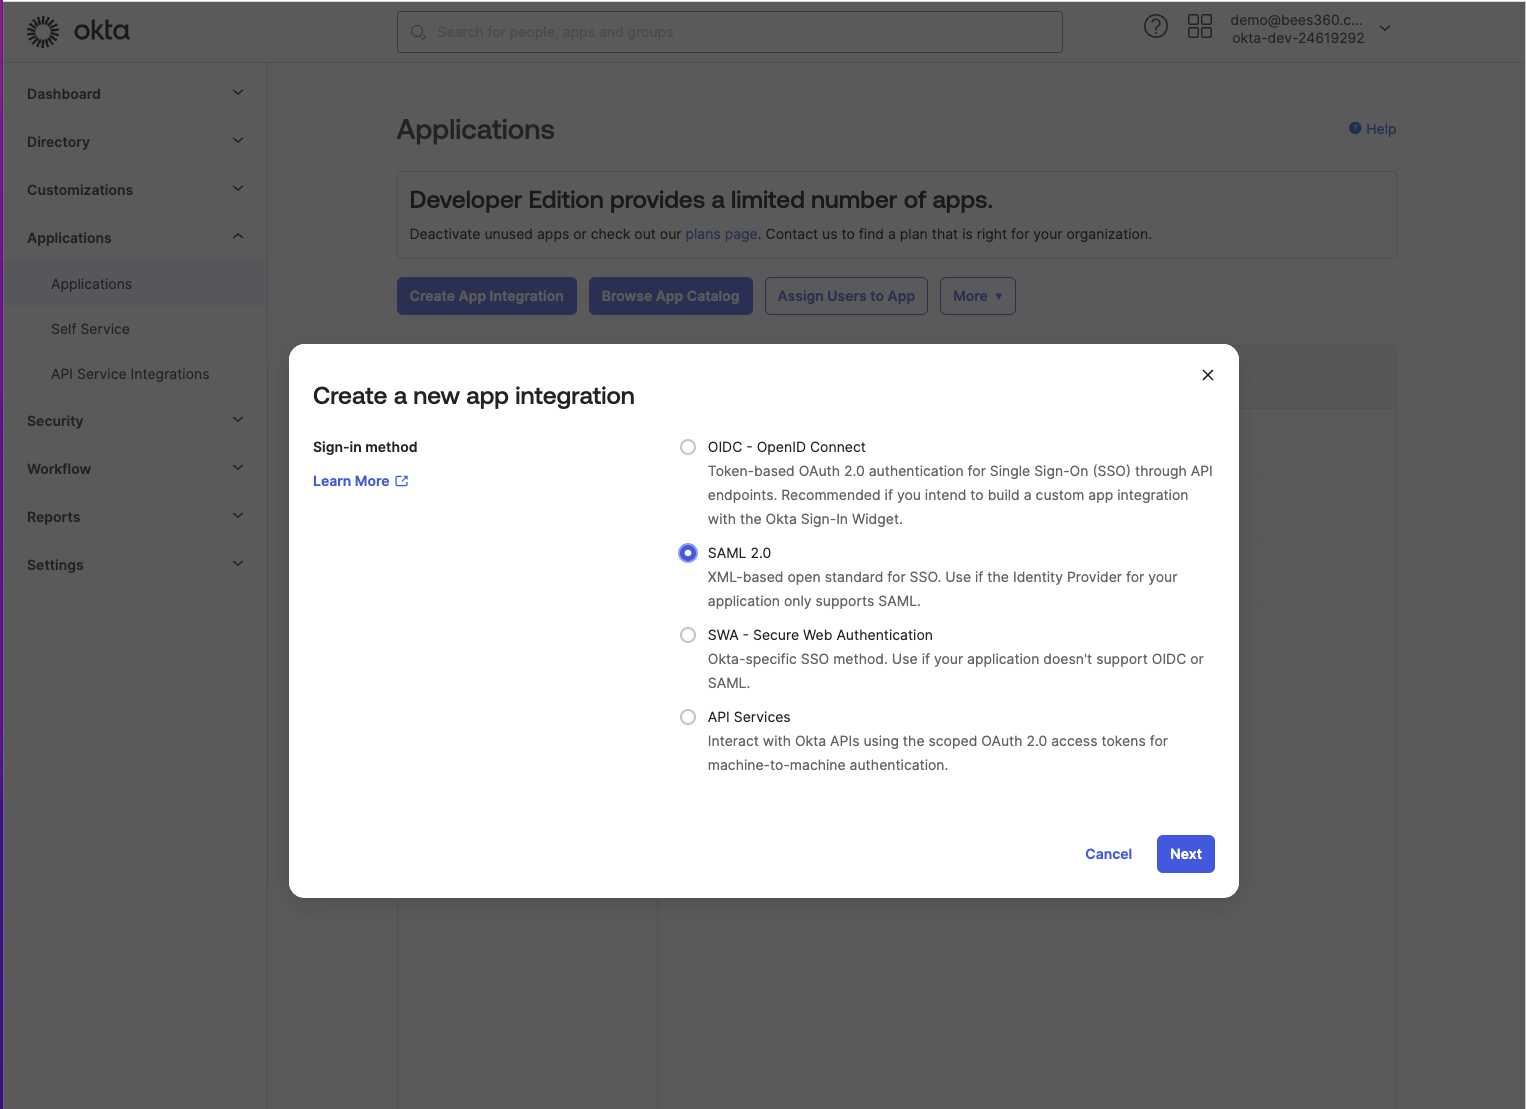
You will see a popup as shown below. Select the sign-in method as ‘SAML 2.0’ and click Next
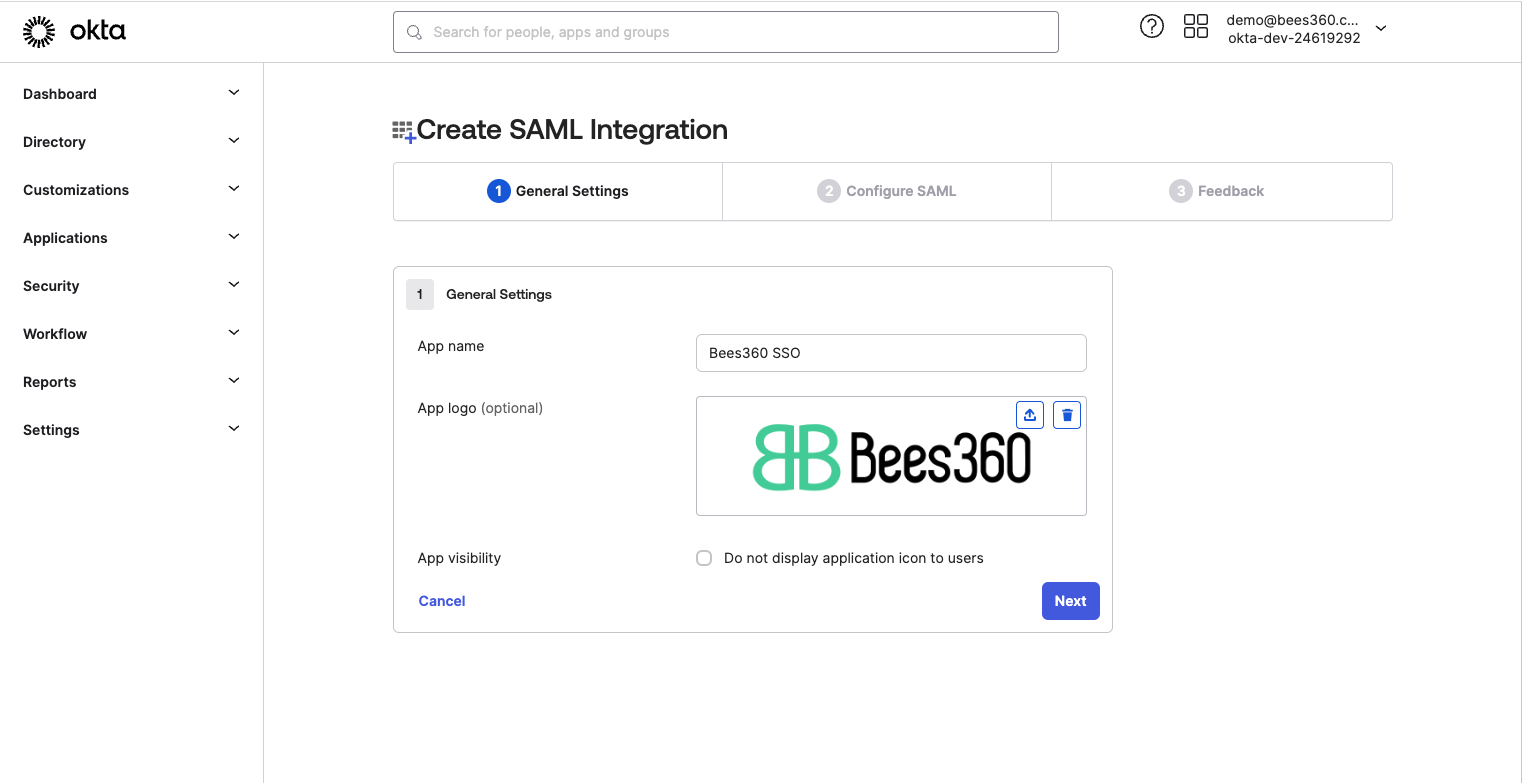
In the next screen, enter an appropriate name for the App you are configuring. This name should be such that your users can recognize and search for it easily from their Okta home page. You should also upload the Bees360 logo from here.
# Step 3: Configuring SAML settings in your App Integration
To configure the SAML settings, follow the below process
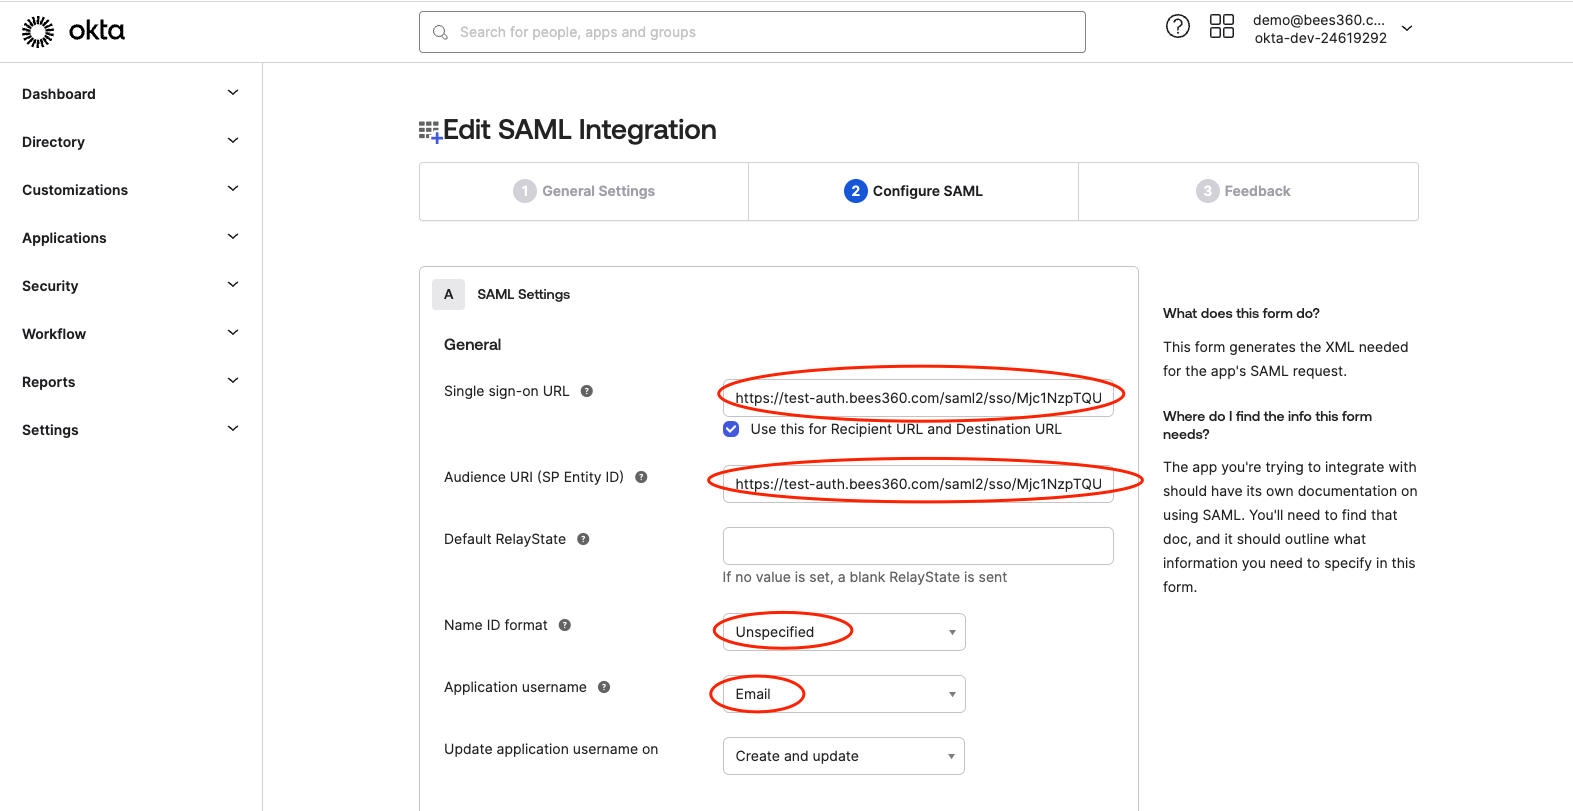
- First copy and paste the values for Single sign on URL (SSO URL) and Audience URI from the other tab where you have the SSO Profile in Bees360 Company Setting.
- Paste the 'SP Entity ID' value from Bees360 SSO Profile in the 'Audience URI (SP Entity ID)' field of Okta App Integration
- Paste the 'SP ACS URL' value from Bees360 SSO Profile in the 'Single sign on URL' field of Okta App Integration
- Keep the checkbox 'Use this for Recipient and Destination URL' selected. Also, keep the 'Default Relay State' blank.
- Next select ‘Unspecified’ as the Name ID Format and select ‘Email’ as the Application username. This configuration tells Okta that the application(Bees360) uses the email address of the users as the username (i.e. unique identifier).
For the next step, click on ‘Show Advanced Settings’.
- In the advanced settings, make sure that the Response and Assertion Signature are selected as ‘Signed’.
- The Assertion Encryption should be kept as ‘Unencrypted’.
- You don’t need to make any other changes in this section.

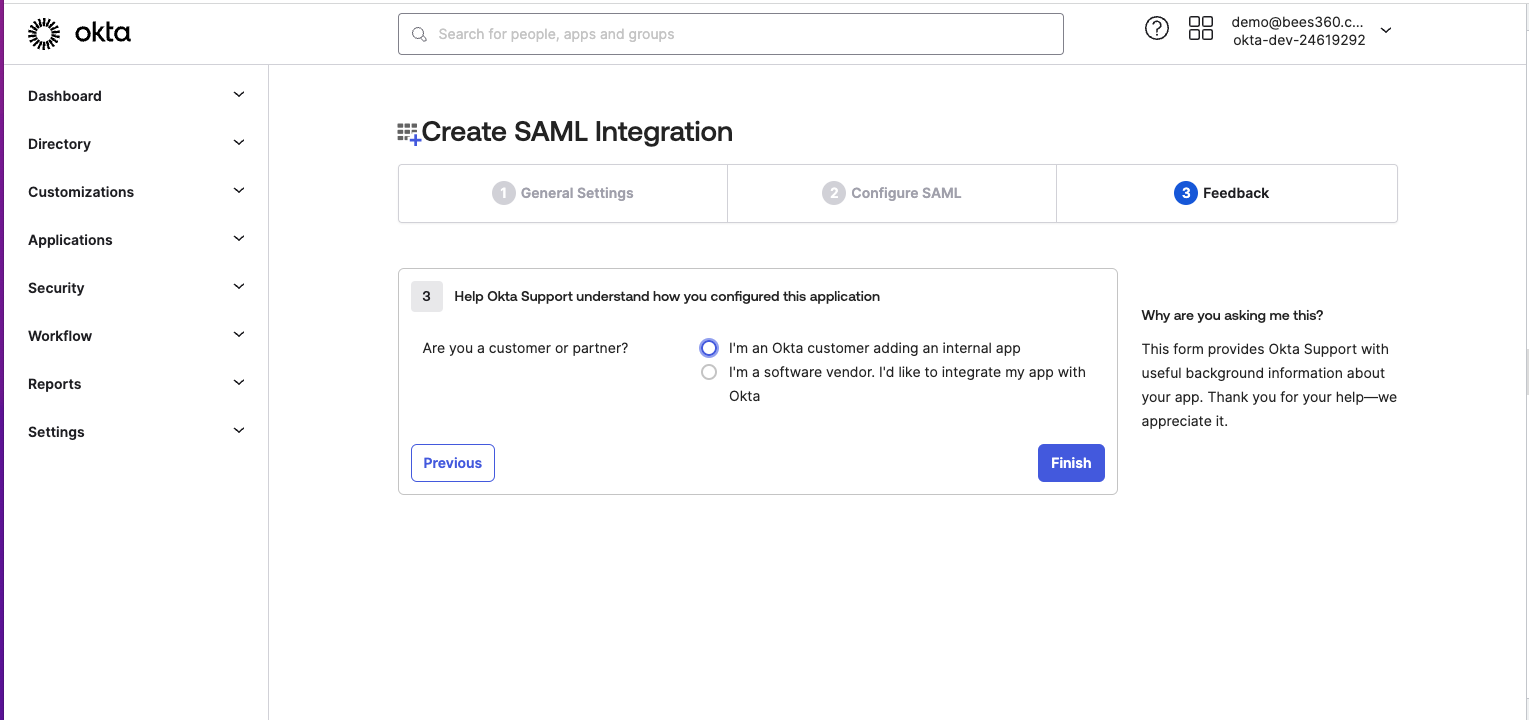
Upon clicking next, you will see the feedback step as shown below - you can simply click ‘Finish’ without entering anything.
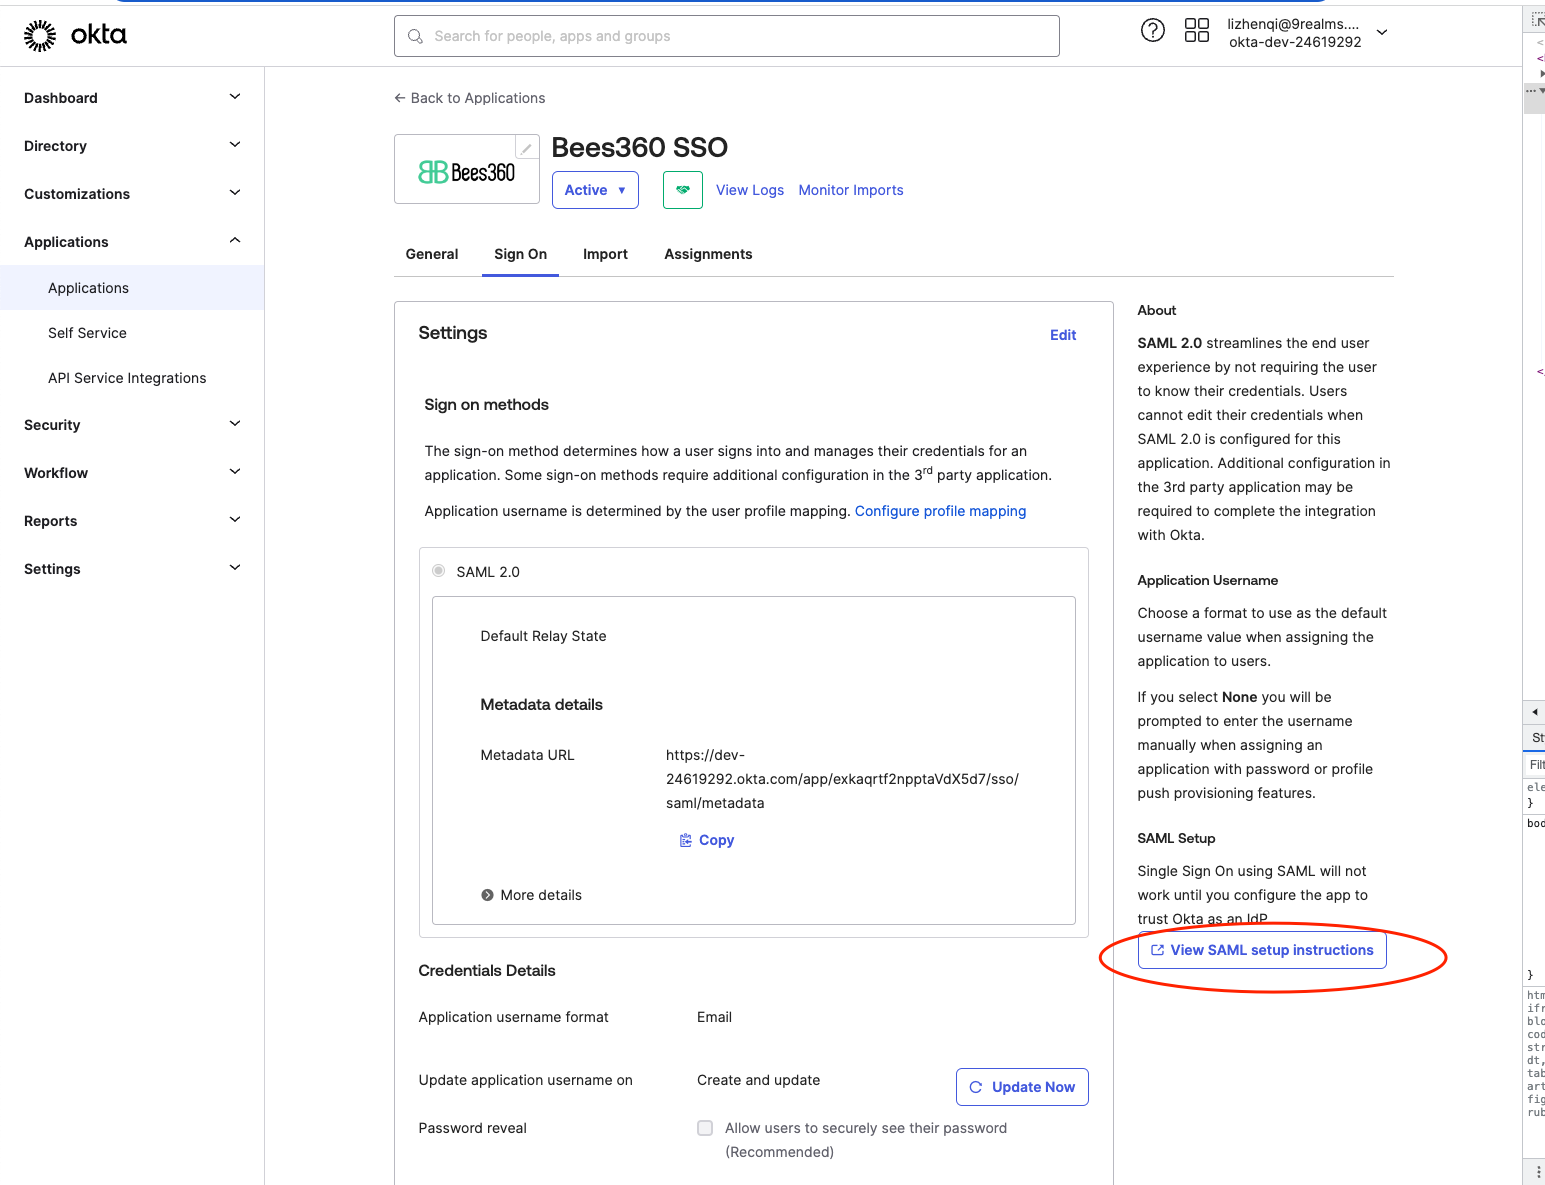
Upon clicking ‘Finish’ you will land on the below screen. Click on the ‘View Setup Instructions’ to view the Identity Provider metadata.
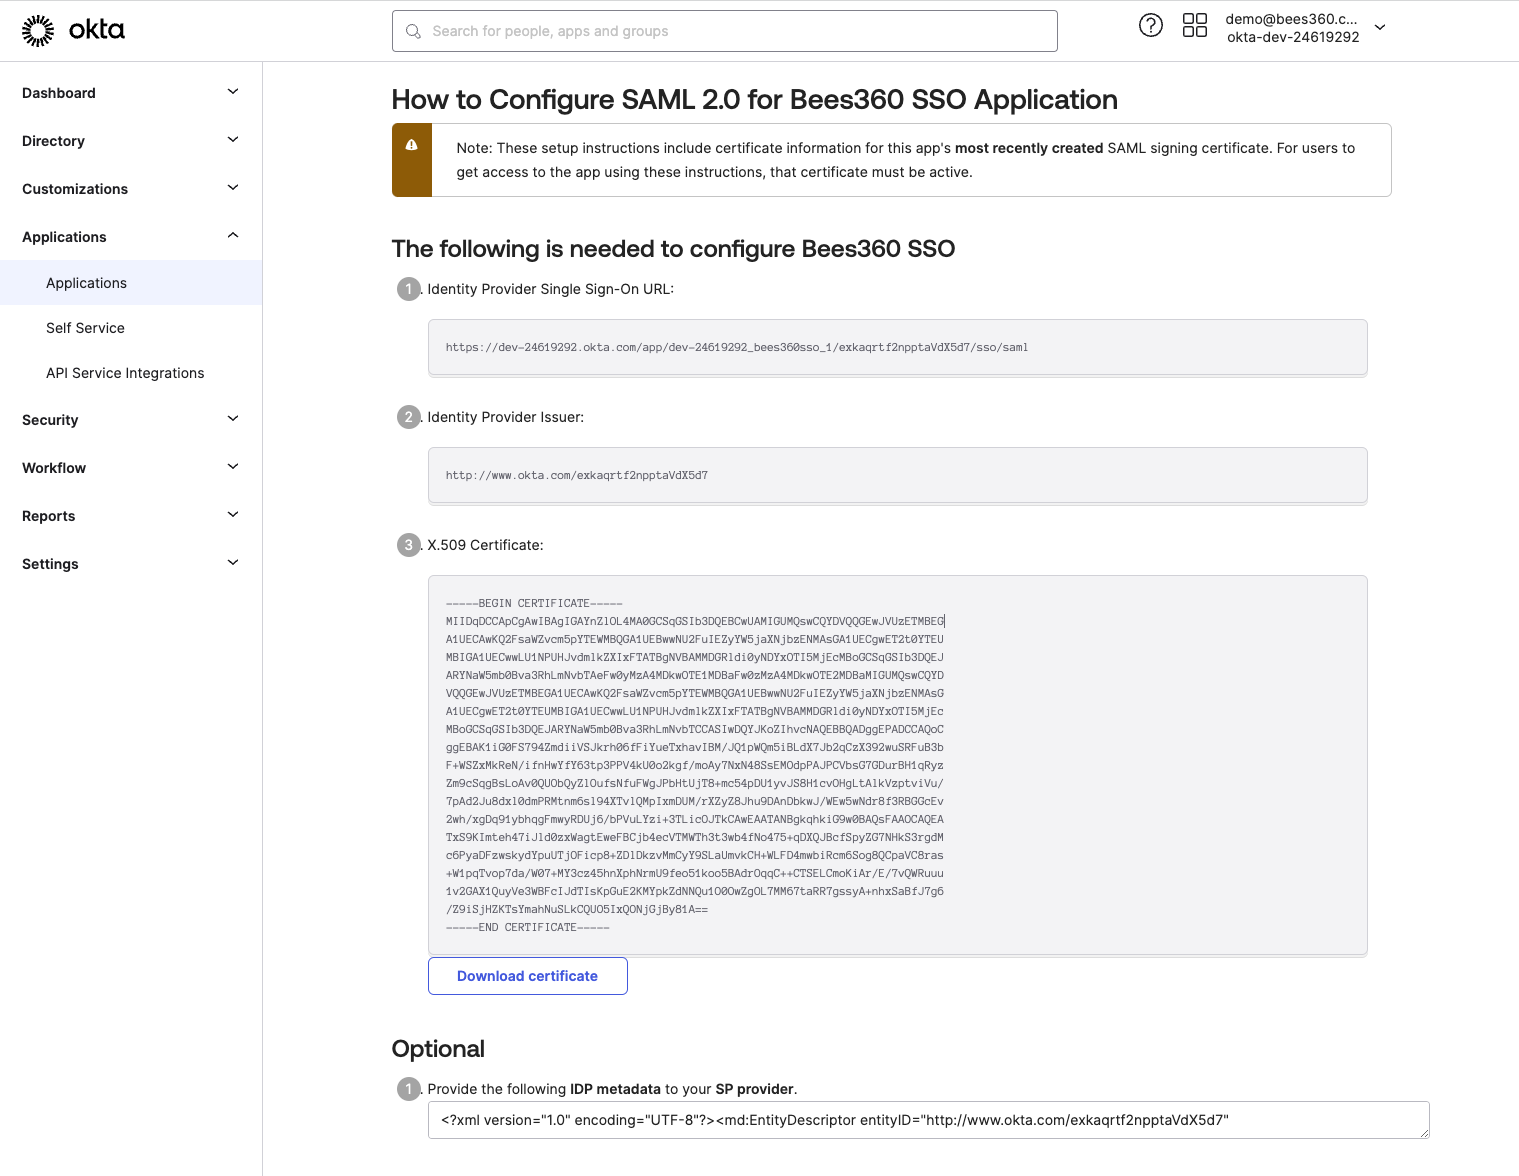
You will see the IdP metadata in a new tab as shown below. Keep this tab open as you will need to copy and paste the values from here into the Bees360 Company Setting in the next step.
# Step 4: Configure your IdP Metadata into the SSO Profile created in Bees360
Go to the tab where you have the Bees360 SSO Profile opened. To configure the 'IdP Info' settings, follow the below process
- Paste the 'Identity Provider Issuer' value from Okta IdP metadata in the 'IdP Entity ID' field of Bees360 IdP Info
- Paste the 'Identity Provider Single Sign-On URL' value from Okta IdP metadata in the 'IdP SSO Target URL' field of Bees360 IdP Info
- Paste the 'X.509 Certificate' value from Okta IdP metadata in the 'Signing Certificate' field of Bees360 IdP Info
After configuring these 3 values from your Okta Application into the Bees360 SSO Profile, click the 'Save' button to save the SSO Profile.
# Step 5: Assign Application to Users
Before users can use SSO to log in to Bees360, you need to assign the Bees360 SSO application to them in Okta.
- In your Okta Admin console, go to Directory -> People and select the user you want to assign the application to.
- Click on the Applications tab and then click the 'Assign Applications' button.
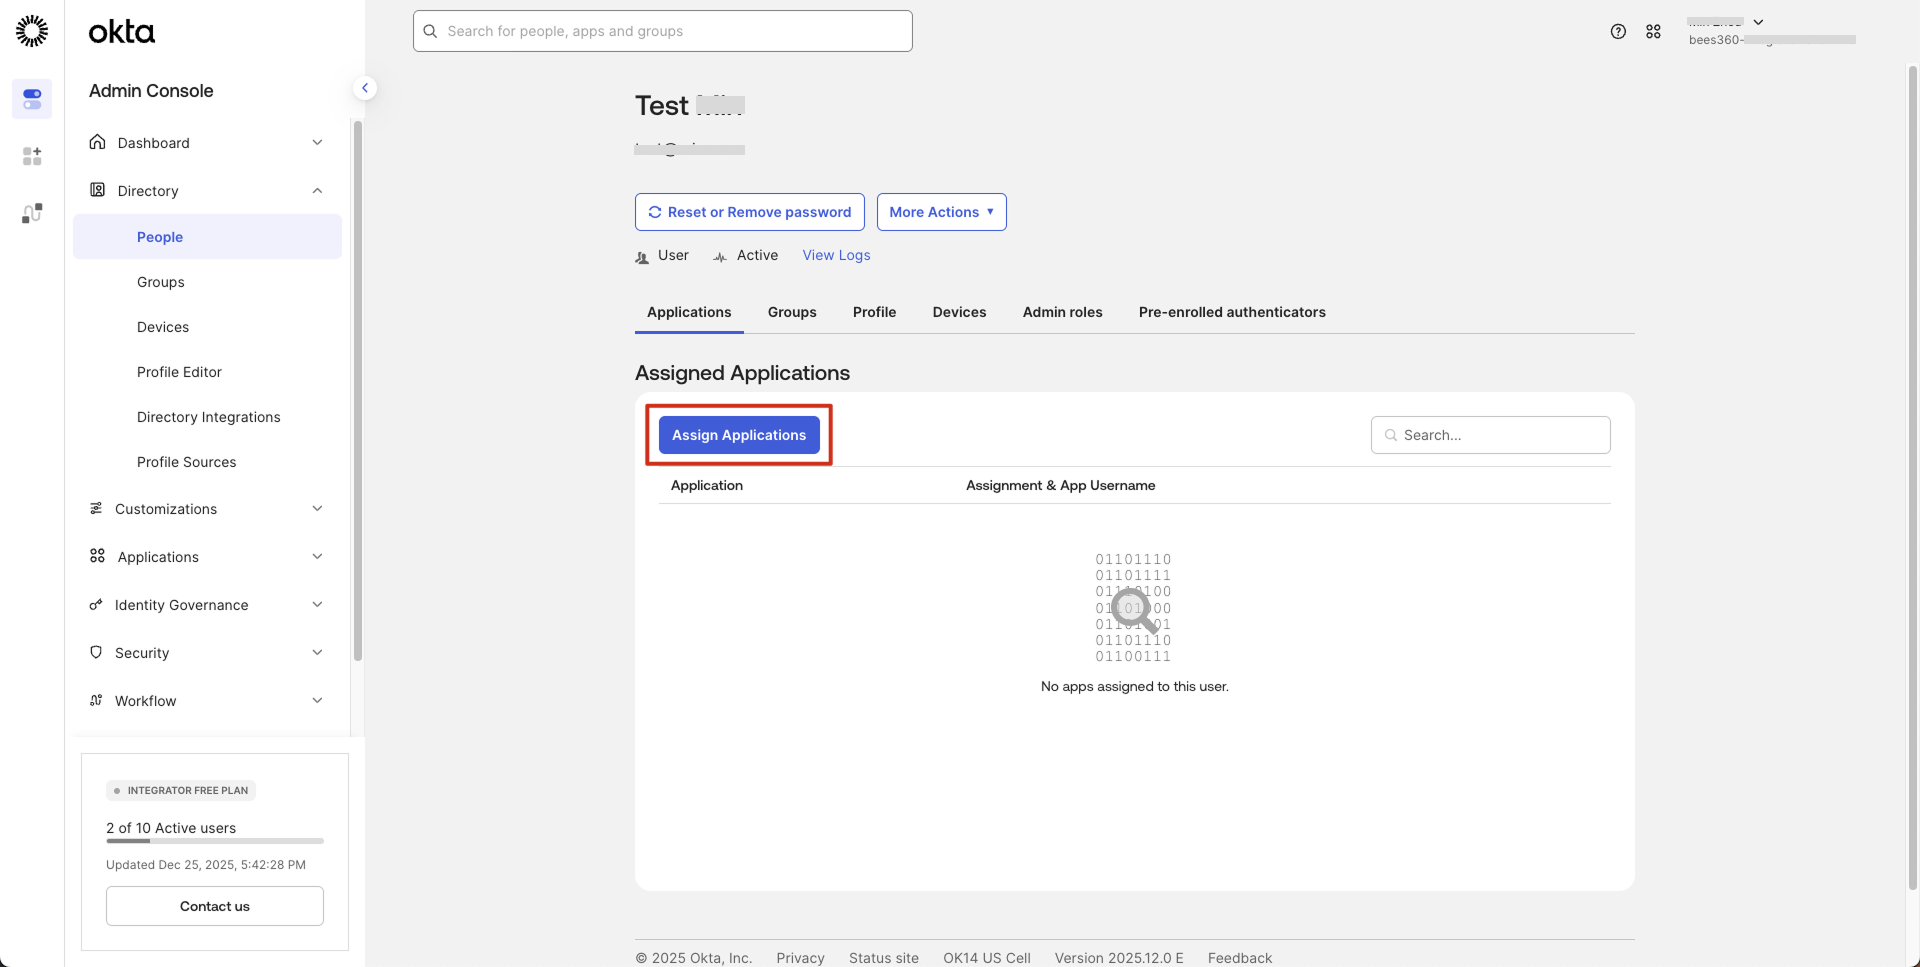
- In the Assign Applications popup, find the Bees360 SSO application and click 'Assign' next to it.
- Click 'Done' to complete the assignment.

After the application is assigned, users can log in to Bees360 using SSO from their Okta dashboard or through the SP-initiated login flow.
# Additional Resources
Okta's documentation for creating a SAML App Integration
# Configuring SSO with any other SAML2.0 Identity Provider
# Step 1: Create a new SSO Profile in Bees360 Company Setting
Click Avatar , go to Company Setting, and click on the Authentication option in the navigation bar as shown below
Create a new SSO Profile by selecting the ‘SAML SSO’ option. You will land on the below screen where you can copy the SP Metadata.
Keep this tab open as you will need to copy and paste the Entity ID and Single Sign On URL values in other SAML2.0 Identity Provider
# Step 2: Create a new SAML Application or App Integration in your Identity Provider
You will need to create an application or integration that will enable your users to be able to log in to the Bees360 via SAML single sign-on.
If your IdP supports multiple login methods for the application then please make sure to select SAML 2.0 as the login method.
Provide an appropriate name to the Application and if your IdP supports then upload Bees360 logo.so that your users can recognize and use the application easily.
# Step 3: Configuring SAML settings in your Application or App Integration
For your IdP to recognize Bees360 SSO you will need to copy and paste the following values from the Bees360 SSO Profile you created in Step 1
- SP Entity ID: this value will be used by your IdP to specify the entity or audience the SAML Assertion is intended for
- SP ACS URL: This is the Bees360 URL where your IdP should send the SAML Response
- Recipient and Destination URLs: If your IdP requires these values to be configured separately then populate the same value as ACS URL in these fields as well
- Default Relay State: should be left blank
Apart from the above, you’ll also need to configure NameID and Signing Option settings in your IdP
- NameID: The NameID format should be Unspecified.
- Signing Option: You should configure your IdP to send ‘Signed’ SAML Response as well as ‘Signed’ SAML Assertion to Bees360.
- Encryption: Bees360 SSO does not support encrypted SAML response. So make sure that your IdP is configured to send unencrypted SAML responses.
# Step 4: Configure your IdP Metadata into the SSO Profile created in Bees360
Go to the tab where you have the Bees360 SSO Profile opened.
You will need to copy and paste the following values from your SAML Application into your Identity Provider
- IdP Entity ID: This is also known as ‘Identity Provider Issuer’, ‘Issuer’, or ‘Identifier’ in some IdPs. This issuer value will be sent by the IdP in the SAML assertion and Bees360 will be verifying that the value configured here matches with the value present in the SAML assertion.
- IdP SSO Target URL: This is also known as ‘SAML Endpoint’, ‘Login URL’, or ‘IdP SSO URL’. This is the URL where Bees360 will send the SAML requests for authenticating users in the SP-initiated login flow
- Signing Certificate/X.509 Signing Certificate (Public Key): This should be the public key of the certificate that will be used to sign the SAML Response and Assertions for the SAML application you have configured in your IdP.